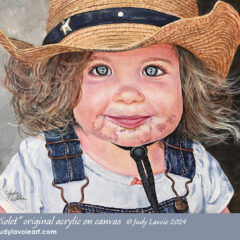
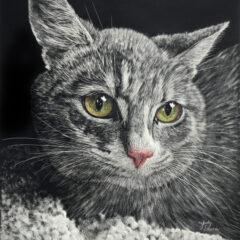
I started doing art as a kid and never stopped! As a fine art painter, my learning curve has often been accelerated by tips and hints I’ve learned from other artists. Sometimes ideas come from workshops or demos, not only from the instructor but from other attendees. Other times they come from creative friends in art groups or other gallery exhibitors. Blogs, newsletters, social media groups and old-fashioned magazines are loaded with good art info. Often a fellow artist simply mentions something they’re doing and I add it to my bag of tricks!
Here are a few art tips, techniques, materials, and ideas I’ve adopted, which I hope you might find helpful in your work:
REFERENCE PHOTOS
– I paint from reference photos and 95% of my paintings have been from my own photos. Exceptions for me have primarily been in commissioned paintings, where my customer provides their photos. In recent times, it’s become so easy to pull images from the internet that many art competitions now require any reference for your paintings can only come from your own photos. This avoids copyright infringements too, and it’s a wise practice in general.
If show rules are not an issue for you, and if you paint animals or birds, sometimes it’s just not possible for you to take your own good reference photos. Those squirrels in my woods just don’t stay still for me, and the cardinals fly off too fast. For fabulous reference photos of nature, I have found a great source specifically for artists’ use. The photos are of exceptional quality, there are hundreds to choose from, and it is very inexpensive. Usage is royalty-free, which means once you purchase a digital photo you can use it as an art reference as many times as you like without any additional fee. “Wildlife Reference Photos For Artists” has photos of wildlife, domestic animals, flowers, land and seascapes, skies, butterflies, aquatic life and still life. If your use fits their “terms of use,” (which seem very straightforward) you pay $10 to download 5 high resolution photos during a 31 day period. NOTE: Paypal is the only payment accepted. The family-based company is located in the UK, with photographers contributing from all over the world.
FRAME PROTECTION
– To keep my frames from getting damaged when moving, storing, or shipping, I find the cardboard and bubble-wrap corners don’t always fit and usually fall off. Instead, I use foam pipe insulators to slide over the sides of the frame for protection. They are inexpensive, readily available wherever plumbing supplies are sold, fit a variety of frame shapes, stay put, and are easy to use. For big frame profiles, pool noodles give similar protection (split lengthwise with scissors).
PALETTE FOR ACRYLICS
– A porcelain “butcher’s tray” is my favorite palette when I’m mixing Golden Fluid Acrylics. This type of acrylic paints are very pigment-rich, so I only need to use a small amount at a time. When I’m switching colors or done a session of painting, the paints wipe off easily from the glossy hard surface of the tray. If paints have dried before clean-up time, I just set the tray in the sink and fill with water. After it soaks for a while I can easily wipe away all the paint residue.
 LIFT WATERCOLOR
– A Mr. Clean “Magic Eraser” (the ones with no added solvents or cleaners) can lift watercolor off paper easily, to make corrections or lighten painted areas. I cut the sponge into smaller pieces for good control on small areas. If you used lots of these sponges (for both art and cleaning), you might want to buy generic melamine sponges online. You can buy 20 generics for about the cost of 3 Magic Erasers; they might be a different size but they work comparably.
PRESERVE GOOD BRUSHES – At the end of a painting session, after cleaning paints from my brushes, I use “The Masters” Brush Cleaner, which cleans, conditions and restores the fibers. Swirl brushes in the cleaner, rinse and repeat until the lather stays white. After the final rinse, smooth the fibers back into their original shape. Alternately, you can leave the Brush Cleaner lather on the shaped fibers to dry, then shake it off as a powder when you next use the brush. This brush cleaner is also good for cleaning make-up brushes!
CREATING FINE LINES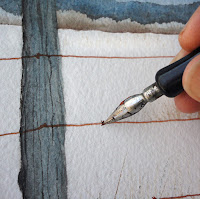 – I use a Speedball standard pen nib (in a pen holder) when I want to make fine lines, giving me better control than with a brush. Dilute the paint and drop some onto the curved back of the pen nib. Test on a scrap of paper or canvas (whatever your painting surface is) to check the flow and get adjusted to using it without any blobs. I find this is my best tool for making narrow lines with a consistent width. I’ve used a pen nib for white whiskers, fur textures, and rusty barbed wire. I sometimes use it also for signing my paintings. Used with diluted gesso, you can glaze over the dry white lines repeatedly and build up wonderful textures for hair, fur, tall grasses and more.
ACRYLIC WHITES
– When using white acrylic paints, there are various whites to select from. Zinc white is somewhat transparent; titanium white has good opacity and tints colors well. Most often I don’t use either… I use white gesso to give the most opaque coverage and great tints.
ROUGH TEXTURES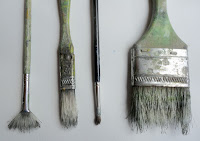 – To paint grassy areas or long fur, I sometimes use old bristle brushes (the type sold in hardware stores) and worn-out artist brushes, which I’ve cut into with scissors to create jagged irregular edges. These help create textures which are random and uneven.
PRESERVING WHITE PAPER
– In traditional watercolor technique, the whites of the paper are the whites of the painting (no white paint applied). Sometimes I want to apply a dark background and go back later to paint lighter values. So when I want to preserve the white paper from other colors, I apply “liquid frisket” to mask the area. Frisket is a latex art product, liquid out of the bottle but solid when dry. When you use it, don’t leave the cap off the bottle or the air will reduce its shelf-life. I pour out a small amount into a cup. My preferred brand is Pebeo Drawing Gum – it goes on smoothly and easily, doesn’t seem to discolor with age, and it’s grey so I can tell where I’ve applied it. Never use a good brush to paint masking frisket, or it can be ruined. Use an old brush and coat it with liquid soap before dipping into the frisket to make clean-up easier. You can also apply frisket with the opposite end of your brush handle, or use a twig, a wood skewer, or other disposable. You can spatter it on with an old toothbrush too. Some frisket makers also sell squeeze bottles with needle-tip applicators. Easily remove frisket from your painting surface by rubbing an edge and pulling or by catching it with a piece of masking tape. It comes off the paper like an elastic band, leaving no residue. Voila, your white paper has been protected from the paint!
CHECK COMPOSITION OBJECTIVELY
– Sometimes it’s difficult to objectively analyze your own paintings while in process. Take a break and set you painting in a place away from your painting area. Let it catch your attention randomly as you are doing other tasks, and you’ll notice things you didn’t previously. It also helps to hold your artwork in front of a mirror or look at it upside down to help see problems with composition such as balance or values. You are less attached to the subject matter and more objective to the technical elements this way.
TAKE A TURN
– Create a distinctive piece of art by starting with a square format, then rotating it 45° to hang as a diamond. Not every subject works out this way, but I’ve done it several times with florals for a great effect. Sometimes when I see a nice ready-made frame for sale, I can’t resist buying it and then creating a painting to fit, as I did with these sunflowers.
PAINT WITHOUT BRUSHES
– When I want to begin a limited-palette watermedia painting with random mixes of primary colors, I don’t brush on the paints. I apply my diluted paints by (1) dribbling from loaded brushes, (2) squeezing from plastic bottles with pointed ends, (3) pouring from small cups, or, (4) for small areas, dripping from eye-droppers. Applied this way, the colors blend beautifully in uncontrolled ways you couldn’t possibly duplicate by brushing them on. You can move paint around with your fingers too! See my painting Bloodroot as an example.
CARBON COPIES
– Millenials don’t really know the meaning of “cc:” as those of us who used carbon for multiple copies on typed pages and forms. For artists, carbon paper comes in ‘graphite’ (easy to erase) rolls or sheets, in black, white, and a few colors. I often use the black graphite to transfer my drawings to watercolor paper or canvas, and the white graphite on black scratchboard surfaces. The photo shows white carbon paper and the black Scratchbord® I transferred my drawing onto in my recent painting of a red-tailed hawk, Scarlett.
 MISTY
MISTY
– Diluted paint in spray bottles has come to the rescue for me at times. For example, see my award-winning painting In The Spotlight. I used a light mist of transparent cool blue watercolor over a portion of a painting in order to make that section less prominent and move it visually to the background. I must admit, I held my breath in the process, hoping I wouldn’t ruin my painting. It worked just as I wanted… phew!
I hope you’ll find an idea here which helps you with your creative endeavors, even if you don’t paint or if your painting style is totally different from mine. Let me know your favorite hints and we’ll both continue to grow.


