Have you ever heard that scratchboards are unforgiving and mistakes can’t be fixed? Forget those rumors, I’ve proven this is not true (fortunately)!
This project began three years ago, when I took a one-day workshop focused on setting up still life arrangements as references for paintings. The class was presented by my dear friend and gifted trompe l’oeil artist Laurie, who is also a terrific art instructor. When each student was ready to create an arrangement, Laurie provided different sized blocks to place below our choice of draped fabric, as well as various lighting options. Many of her own collectibles were available for us to use, but I had brought my own selection of game pieces, since I am a lifelong fan of games. As I arranged my individual items, Laurie suggested including her wooden hand model - this made a great addition. I took about 18 photos, trying minor rearrangements, various lighting, and different viewpoints.
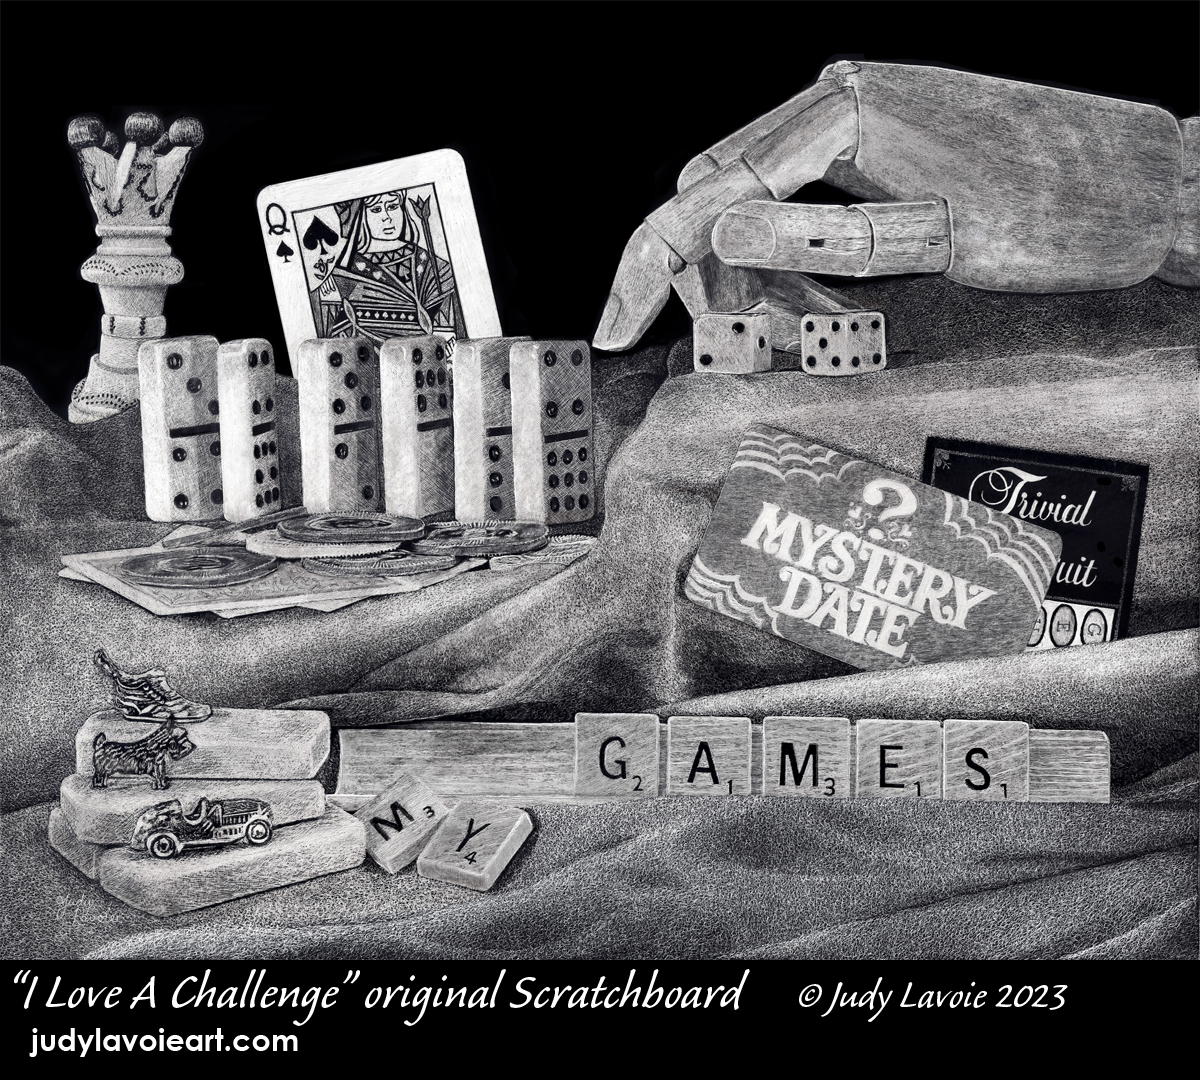
It was a year later before I decided this still life arrangement might make a good scratchboard painting. The subject matter was unusual, there was strong contrast and a wide range of values, and the game pieces, hand, and draped fabric created a wide variety of textures. The lighting was subtle but provided nice highlights and shadows, particularly in the soft foods of the cloth. I thought this still life might make a good piece to enter into an upcoming scratchboard exhibition… if I could pull it off.
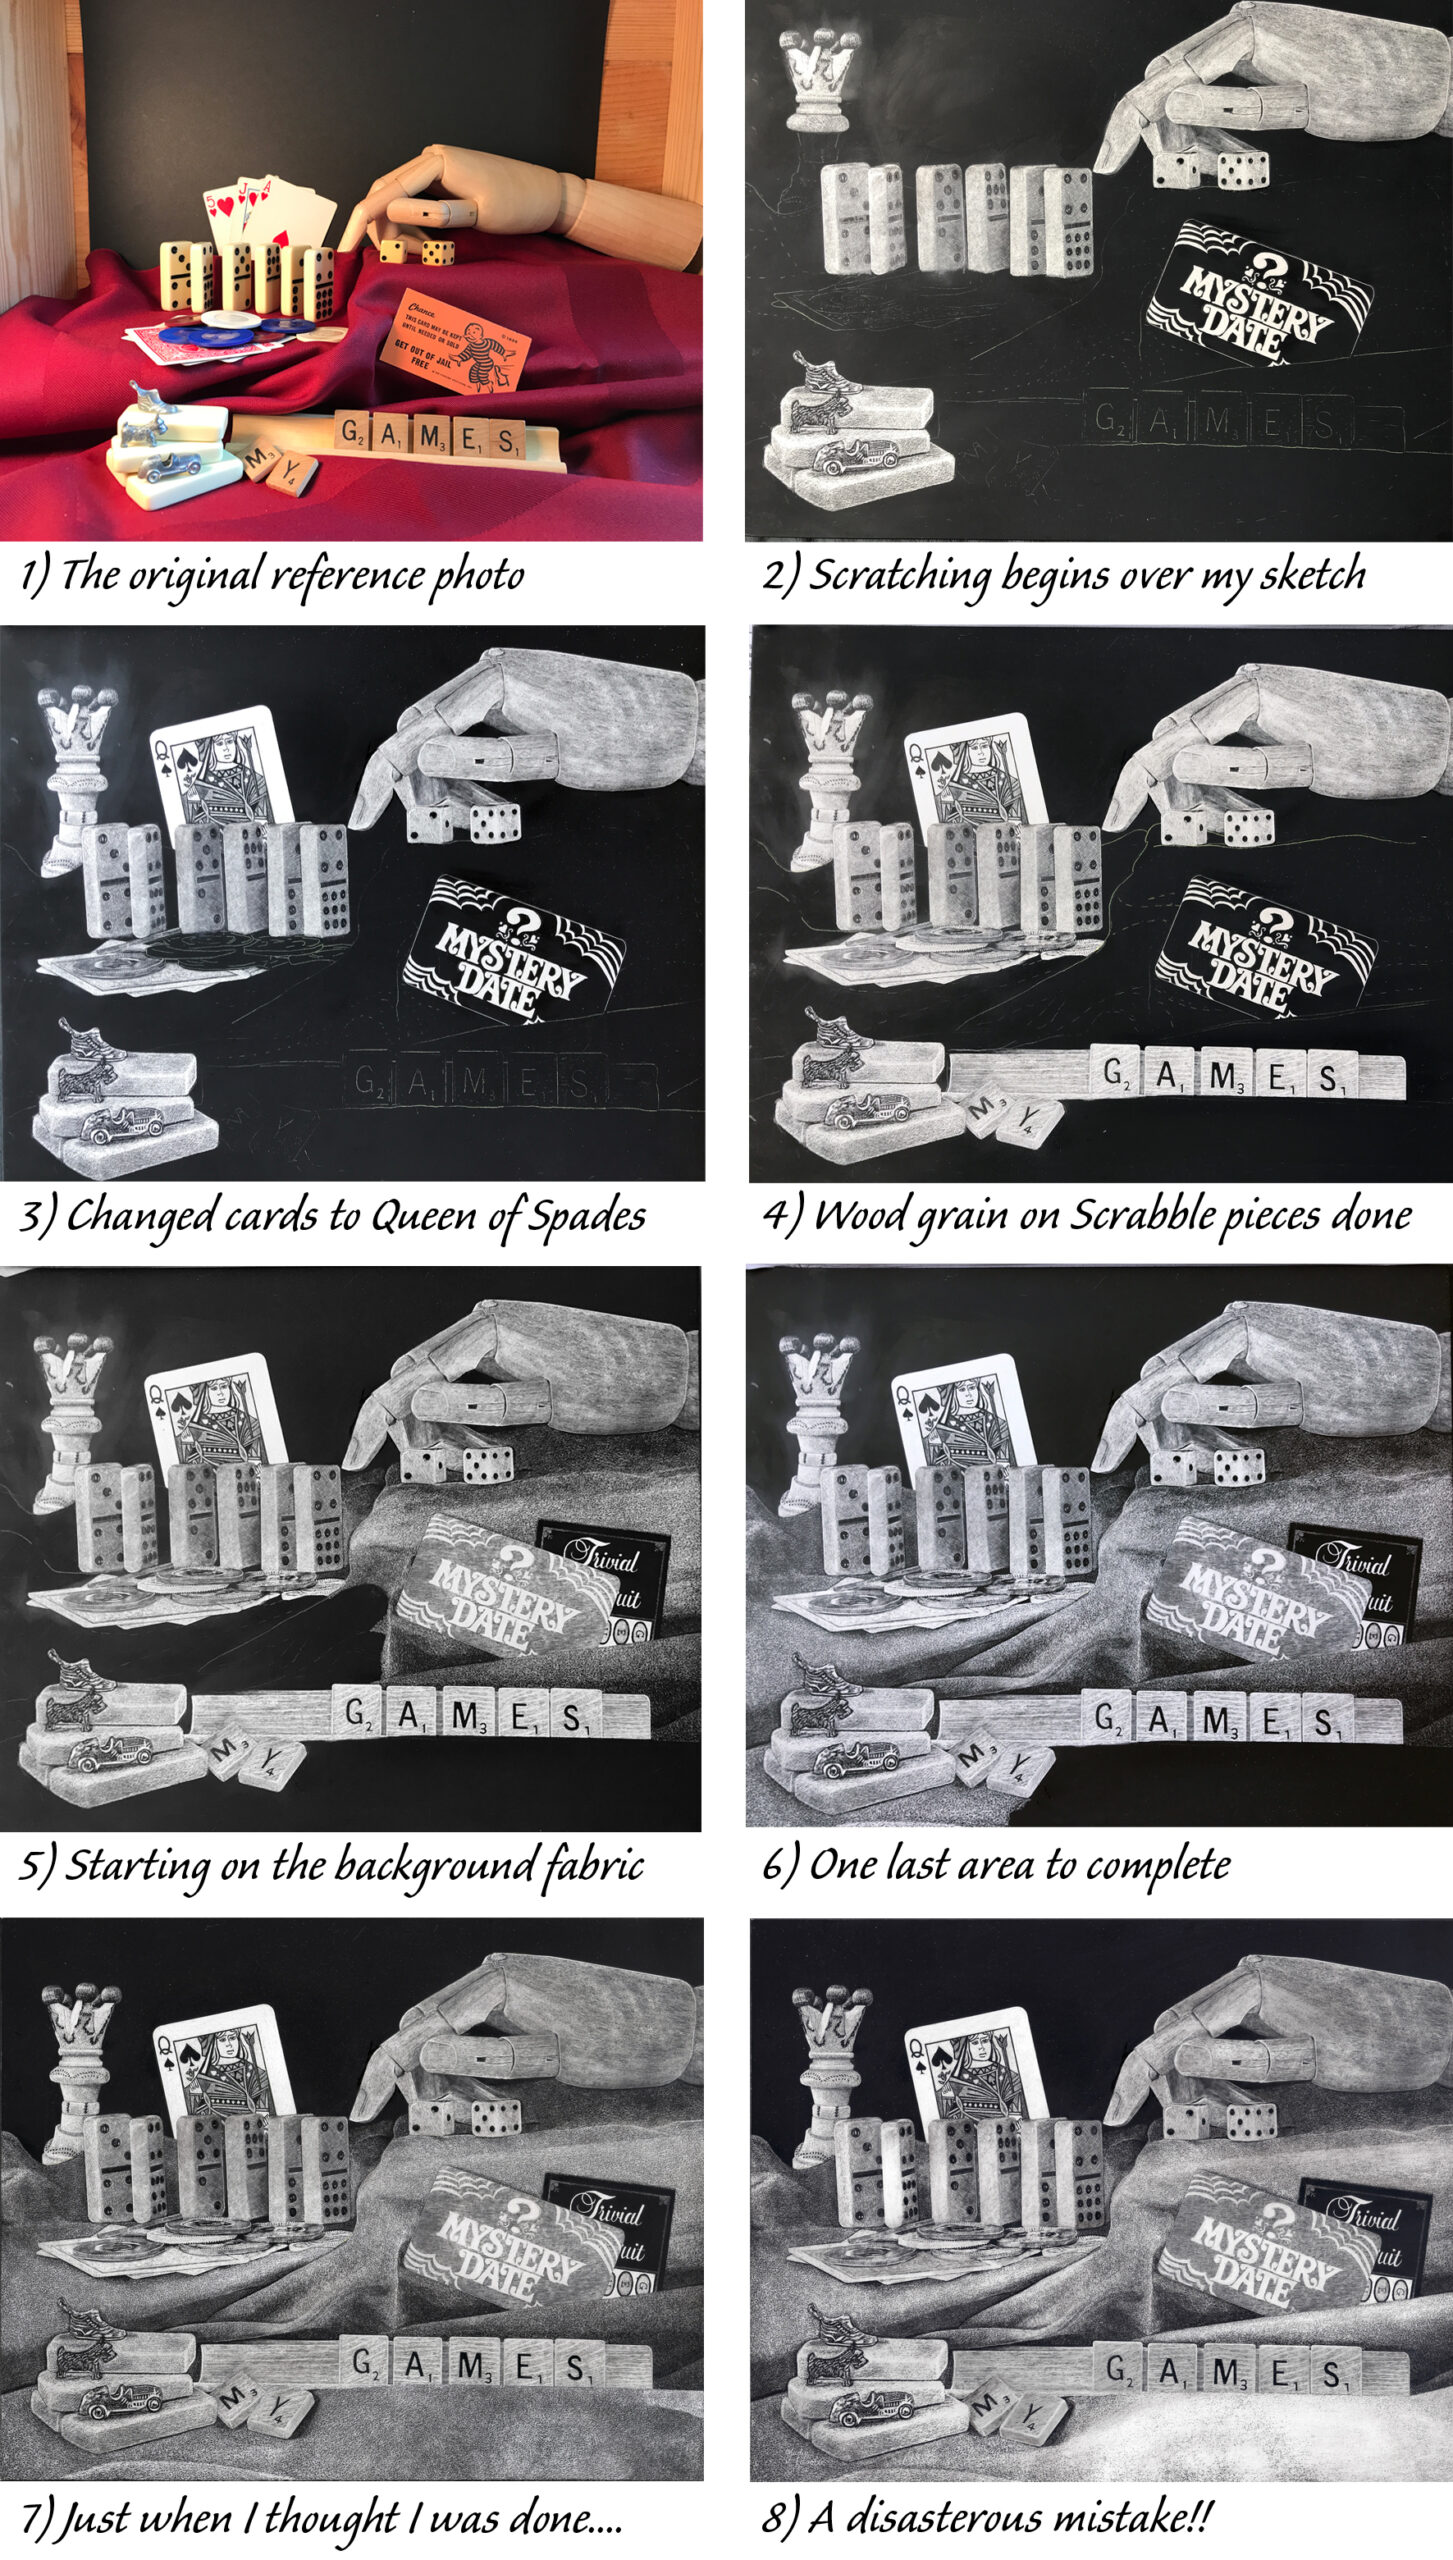
This was to be the most difficult scratchboard I had yet attempted. I’m never one to shy away from challenges, so I went back through my photos to select the one to use as my reference. I cropped it tightly, putting all the focus on the collection as a whole. Don’t ever hesitate to make changes from your reference photo - you are the artist, and it’s your option. If you add items, try to match the lighting and size them appropriately with the rest of the image. Look at the overall composition, and make sure you consider balance, values, variety, and other design factors as you move things or make additions or deletions.
In the year since the workshop, my husband Rick and I had started playing chess, so I wanted to add a chess piece to my game still-life. I photographed some of our wooden chess pieces and decided to position a white queen in the top left of my composition. I also changed the group of three playing cards - which had reflected the highest cards in a favorite card game called “45s” - and use just a queen of spades. This would be more interesting visually, and it’s a card which stars in two other card games, “Hearts” and “Old Maid.” My final change was to replace the Get Out Of Jail card, since I already had a reference to Monopoly with the three playing pieces. In its place I chose a card from each of two other favorite games, Mystery Date (popular when I was a kid) and Trivial Pursuit. Now the challenge was how to scratch all these objects!
The first collage of photos here shows many of my steps as the work slowly progressed. It was all coming together nicely, and I enjoyed the process. I used many different scratching techniques and a handful of different tools, trying to capture the wood grains, fabric surface, metal game pieces, cards, and smooth rounded dominoes and dice. I incorporated hard and soft edges, preserving the strong unscratched black background. The panel was 8”x10”, but I proceeded carefully and slowly, constantly adjusting my values. I was investing many many hours in this piece.
I was nearing the finish, ready to give the scratchboard panel a careful dusting to wipe away the fine black dust which scratching creates, one last time. That’s when disaster struck!! I grabbed a cloth from my work table and began in the bottom right corner, lightly wiping the scratched surface. OH NO - what was happening?? The cloth was rubbing off my unscratched black marks, turning the bottom right corner into white! I couldn’t believe what I saw. What had I done? My piece was ruined. I was so upset, I didn’t know what to do other than throw that cloth into the trash. In hindsight, it was maybe a “magic eraser cloth,” left on my table from a session painting with watercolors. That didn’t matter so much at this point; I needed to calm down, forget about getting this done by the show deadline, and put it aside until I could work out a fix-it plan. I hated to look at the artwork, afraid that all my handwork might destroyed. I knew I had to walk away.
More than a week passed before I recovered from my anger and disappointment and started to formulate how to repair my still life. Before I touched the artwork, I needed to test it out on a pristine small scratchboard panel, mimicking what had happened. So I took a 5x7 scratchboard and began by scratching an area in the same way I had ‘scumbled’ little circular marks to depict the fabric. Then I wiped it away in a similar way as with my original blunder. In the whitened area I could still see tiny remnants of my scratching marks, even though I use a very light touch. This test would determine whether these marks would show with my repair technique.
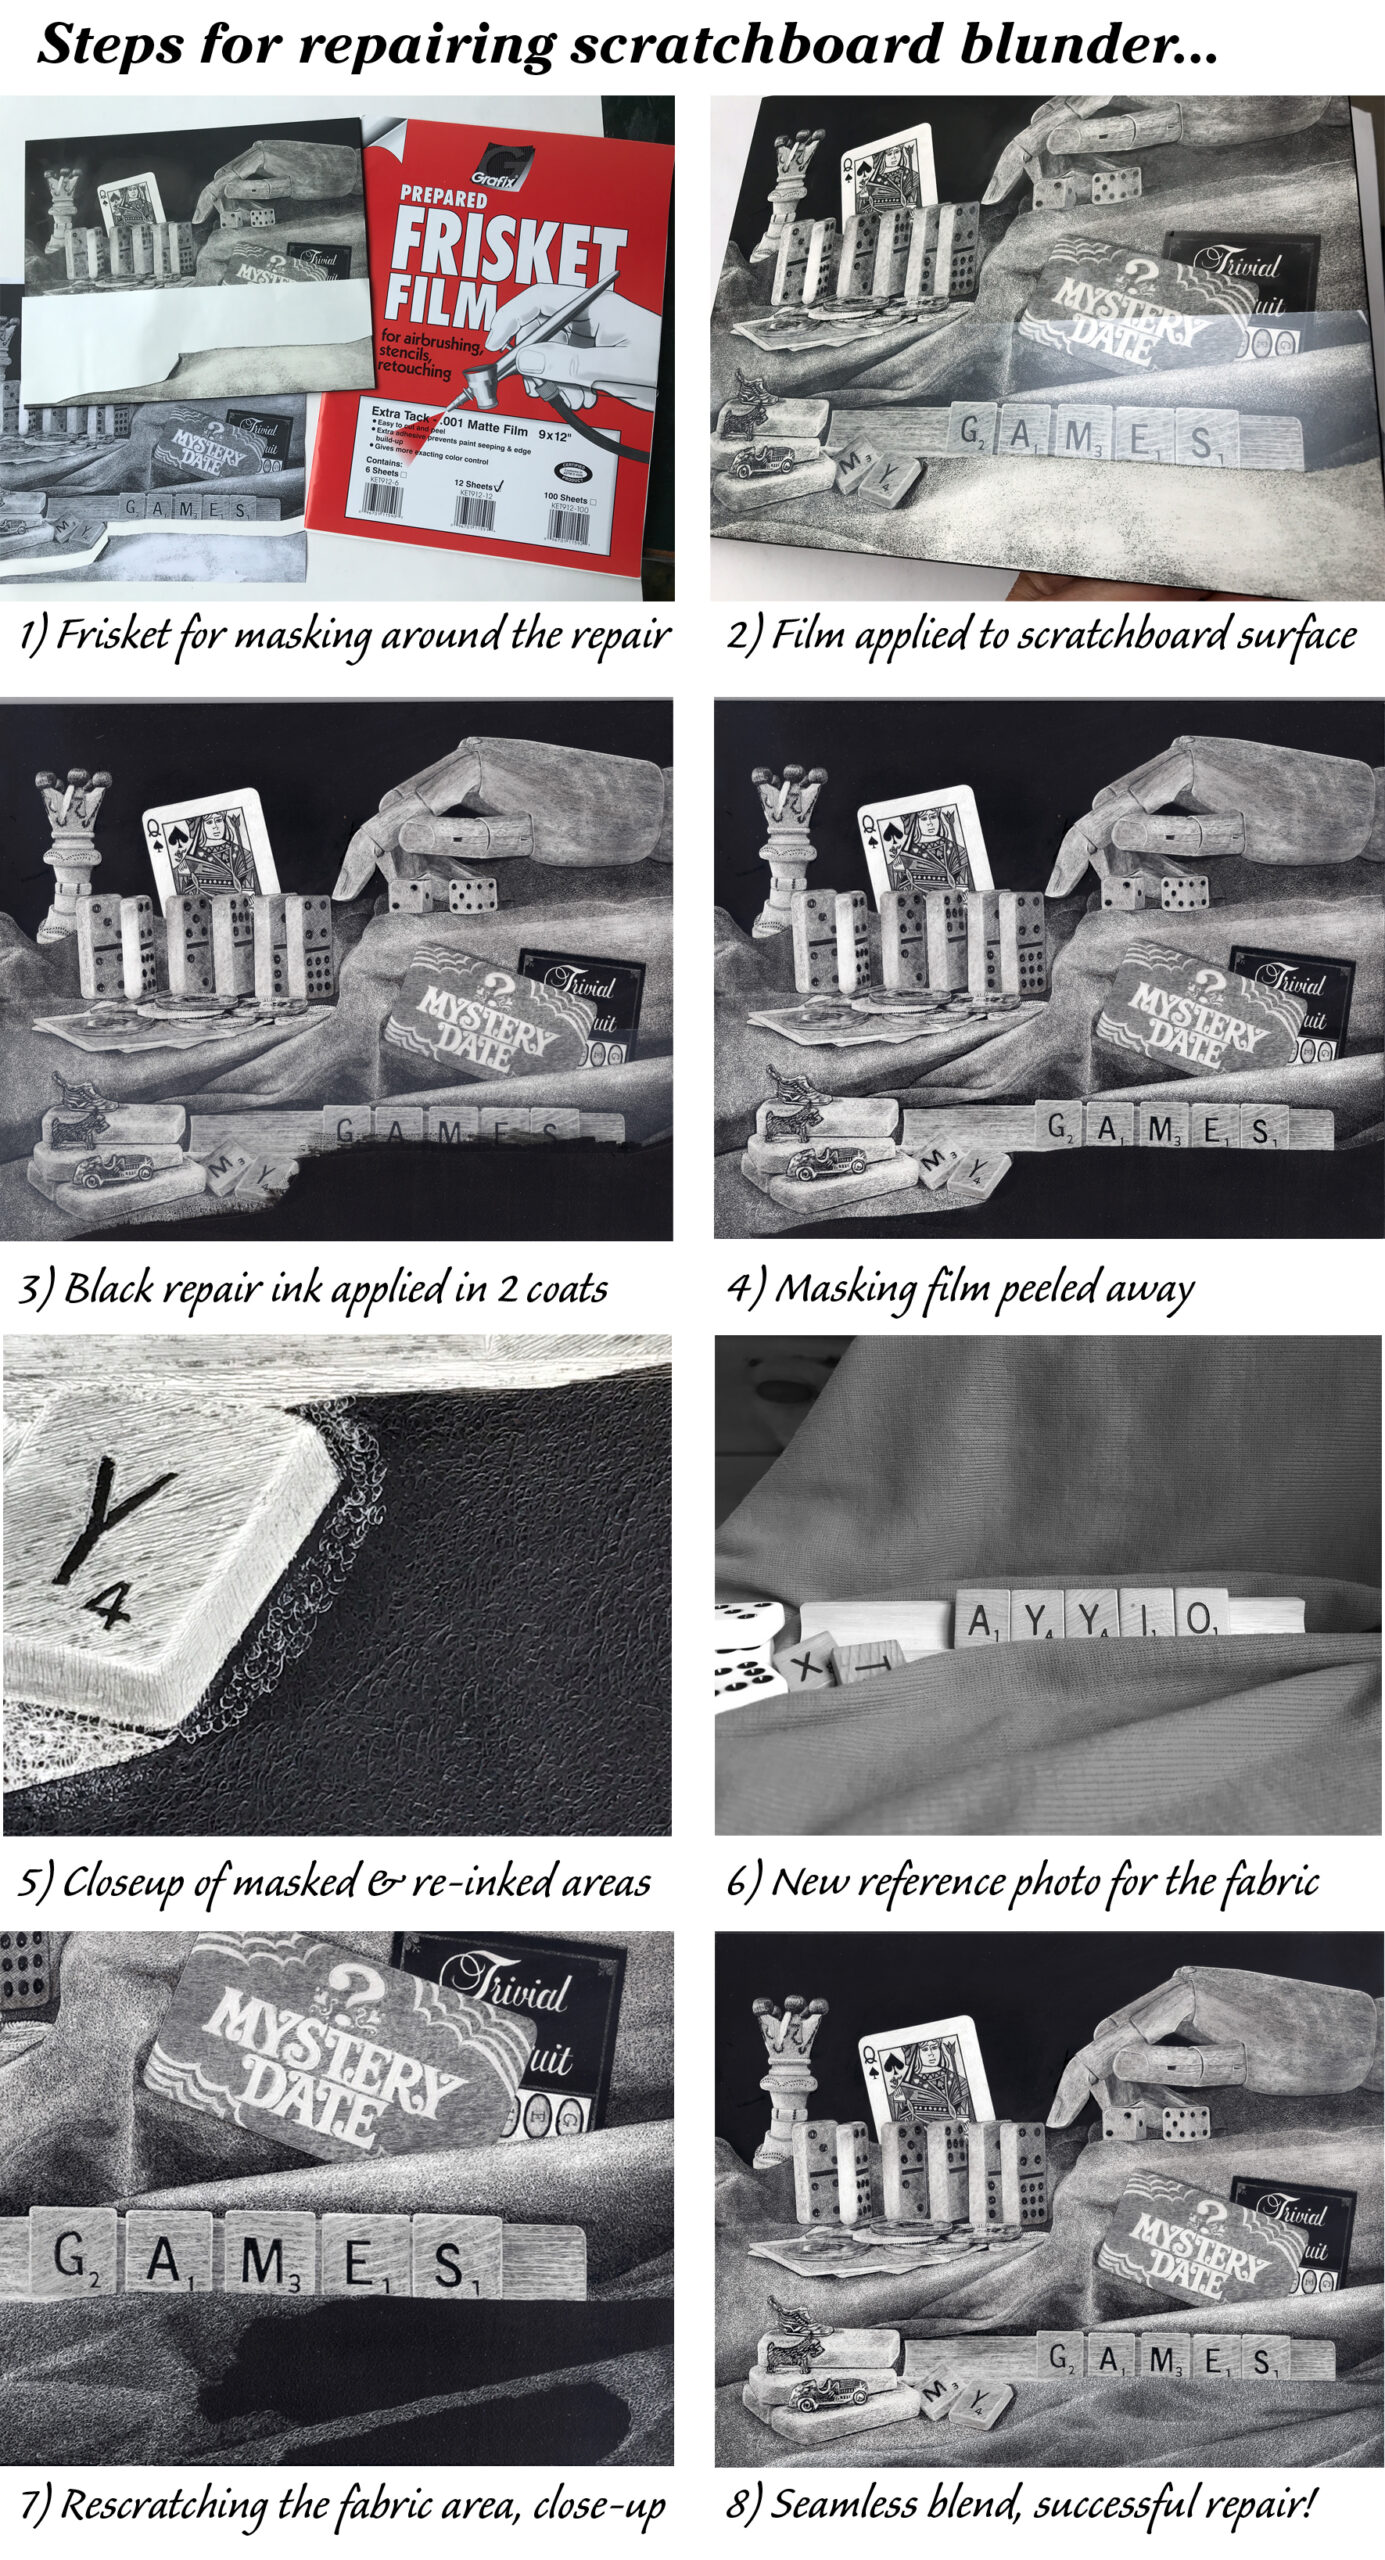
Now for the “fix.” I used Ampersand’s “Black Repair Ink,” from their Scratchbord/Claybord set of 6 colors, which matches the black used on their manufactured Scratchbord panels. I brushed on two coats to get a solid black, drying between, trying to keep the surface as smooth as possible. I could still see some of the scratched marks below the solid black coating by tilting the panel to the light, but the area felt smooth to the touch. I let this dry overnight. Then I re-scratched the area to create the fabric texture. The test results looked great. I was convinced I could save my artwork. The challenge now was to do this same repair on my still life, seamlessly blending into the undamaged area.
I decided the botched up area would look better if I changed the original reference so that the fabric in the bottom right was less flat. I took a piece of my own fabric and arranged it with soft folds to mimic the damaged area. Then I photographed it for a new reference of the repair area. Next step was to mask and protect the undamaged area around where I would make the repair, in a way which would disguise any apparent joins. I made a copy of the art and traced the shape needed for masking. I used this guide to cut a piece of frisket film, then adhered it to my scratchboard surface. Frisket is made for art masking, like when using an airbrush, and is low-tack and it removes easily and shouldn’t leave any residue. I took my time on all these steps, knowing it would all be worthwhile if I could rescue my painting. Little by little I recreated the process from my test piece, being especially carefully to blend the edges with the existing textures. It all worked, hoorah! I actually liked the new fabric area better than what I had unintentionally destroyed! And proof: you can fix mistakes on a scratchboard - even big ones!
I had missed a show deadline, but there would be other shows. More of a challenge than I was expecting, but it was worth it. I won an award in the first “open media” show into which I entered “I Love A Challenge” later that year. Two years have passed since I completed this scratchboard, and I have just learned that has been accepted from my three entries into the 14th Annual Exhibition of the International Scratchboard Society 2025*. I am overjoyed. This is a highly prestigious show, with amazing scratchboard paintings from artists all over the world, so I am extremely honored to be juried in again.
* This exhibition takes place September 17 - November 15, 2025 at the Page-Walker Arts & History Museum, Cary, NC.