I’ve just completed one of two commissioned pet portraits I’ve been creating simultaneously. This one is of my ‘god-dog’ who is named Lonesome. He is the most timid dog I’ve ever met, always slipping off to the security of his dog bed when guests are at his house. My husband Rick took it as a personal challenge to convince Lonesome that it was safe to let Rick get close. It took a little while, but they eventually bonded. Our eldest doggie Ellie Mae truly broke the ice, and Lonesome acts playful and happy when they are together. After a few introductory visits, Lonesome now enjoys staying at our house when his folks are away, and we love having him here. And he always seems very relaxed in the presence of our three fur babies.
I struggled to get some good reference photos for the portrait which Kathy and Jim requested, and Kathy provided me with some she had captured of him. We finally narrowed it down to one with Lonesome looking straight at the camera. Before I got started on the painting, we were at a friend’s gathering and I took more photos of Lonesome. I finally got what I considered an ideal shot, with Lonesome’s beautiful brown eyes intensely observing the happenings, in an apprehensive and interesting pose. With the background eliminated, I knew I could capture his personality from this photo.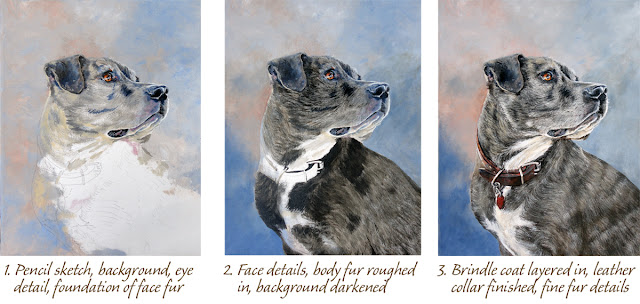
After sketching on my canvas in pencil, I selected a blend of peach, blue and grey tones for the background, accenting the colors I’d use to paint Lonesome. I like to paint eyes early in my pet portraits, since it makes my subject come to life. Lonesome’s fur was a particular challenge; his gorgeous brindle coat is a mixture of many colors of hair. You can see how my initial hues on his face include lots of blues and tans, with touches of pink. With acrylic paints, unlike transparent watercolors, I can apply light over dark or dark over light… and I did both to get the effects I wanted. I enjoyed creating the leather collar and shiny hardware, along with the dangling red tag.
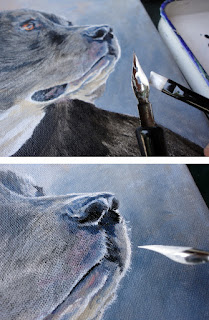
I have a few old bristle paint brushes which I’ve chopped away at to make them irregular, as the photo shows. These help me apply paint strokes which simulate the texture of hair. Also, to paint fine lines of fur and whiskers, I sometimes switch from a paintbrush to an old Speedball nib pen with diluted color, as shown below. I used this technique with strokes of white gesso, also with black acrylic paint in Lonesome’s fur. I use glazing liquid mixed with my acrylic paints to make them transparent, then I can layer dark tones over light. For example, after completing the painting to the stage shown in #3 above, I decided the white fur along the top of Lonesome’s mouth opening was too stark. So I mixed a tiny bit of Carbon Black paint with glazing liquid and painted over the pure white line of hair. This resulted in the mouth still being defined by a light area, but the transition was softener when the white became a pale grey. Gradually I was able to build up Lonesome’s coat to capture the coloring and the softness of his coat.
 Whenever I do a commissioned painting, I complete it to the point where I feel it is finished, then I let my patrons take a look. With acrylics I can alter the artwork if requested. Once I have final approval, I sign the art – in this case I did it with white gesso on that Speedball pen nib, then with glazing liquid mixed into Paynes Grey (a dark blue) after the gesso had dried.
If I’ve painted on a “gallery-wrapped” canvas – one which has the canvas fabric stapled on the back of the wood stretchers vs. on the sides – I apply an opaque coating of black or another dark color on the sides. This way the painting can be hung without framing, if desired.
Acrylic paintings have a microscopic porous surface, which can pick up dirt and dust over time. I routinely seal my acrylic painting. At least 24 hours after my last application of paint, I coat the surface with 3 clear layers. The first is an isolation coat, which is a clear coating between the paint surface and the top varnish. The isolation coat seals the absorbent areas of the acrylic to create an even surface for the next step, the varnish. I mix my isolation coat using Golden Artist Colors brand Soft Gel diluted with water in a 2:1 mix. I paint the isolation coat on the acrylic surface with a wide brush, evenly moving the brush across the painting horizontally, then vertically, being careful to avoid leaving brush strokes. I can check for streaks or uncoated surface areas by looking at the painting at an angle. When the isolation coat has dried for several hours, I similarly brush on a coat of varnish, fixing Golden Satin Varnish in a proportion of 40% water to 60% varnish. After this dries, I apply a second coat of the same mixture. Varnish makes the surface dust-resistant and it is removable with ammonia, when and if necessary in the future. The isolation coat helps the varnish from being absorbed within the acrylic painted surface, protecting the painting if the varnish is ever removed. Some of the acrylic paints I use go on a bit more glossy, which I notice with Carbon Black. These finish coats create an even sheen to the whole painting surface.
Every so often I’m asked what is my favorite subject to paint. I love painting a wide variety, but if I was restricted to only one I’d choose dog portraits. Each one is as unique as the lovable creature it portrays, and I know I am bringing joy to the owners with my work.


