 I created “Sweet Dreams” with a few new twists – not counting the twisted body of the cute little kitten:
- The reference photo is not one I took
- I selected an unusual palette of colors
- The application of paint was unconventional
- Watercolor pencils added some finishing touches
From the first time I saw my friend Dawn’s photo of this kitty, I knew I had to paint it. Dawn had rescued her the middle of the road when she was ‘no bigger than your hand.’ Dawn and her friend Olivia strengthened her as she grew. The photo certainly shows how happy she is at her forever home.
The photo’s appeal to me was not only the cute, cuddly, contented appearance and the smile it gave me, but the challenge of recreating the interesting pose and variety of textures. Once I got Dawn’s permission to use her shot as a reference, I gave much thought to the best way to create it. Should I work on paper, on canvas, or on white or black scratchboard? Should I use watercolor, acrylics, or scratching only? What combination would best allow me to depict the soft fuzzy texture of the pink sheepskin as well as the fur of the kitten? I decided to work with watercolors on white Aquabord® scratchboard, and thought out the steps I’d use to create the final results, as pictured in my mind.
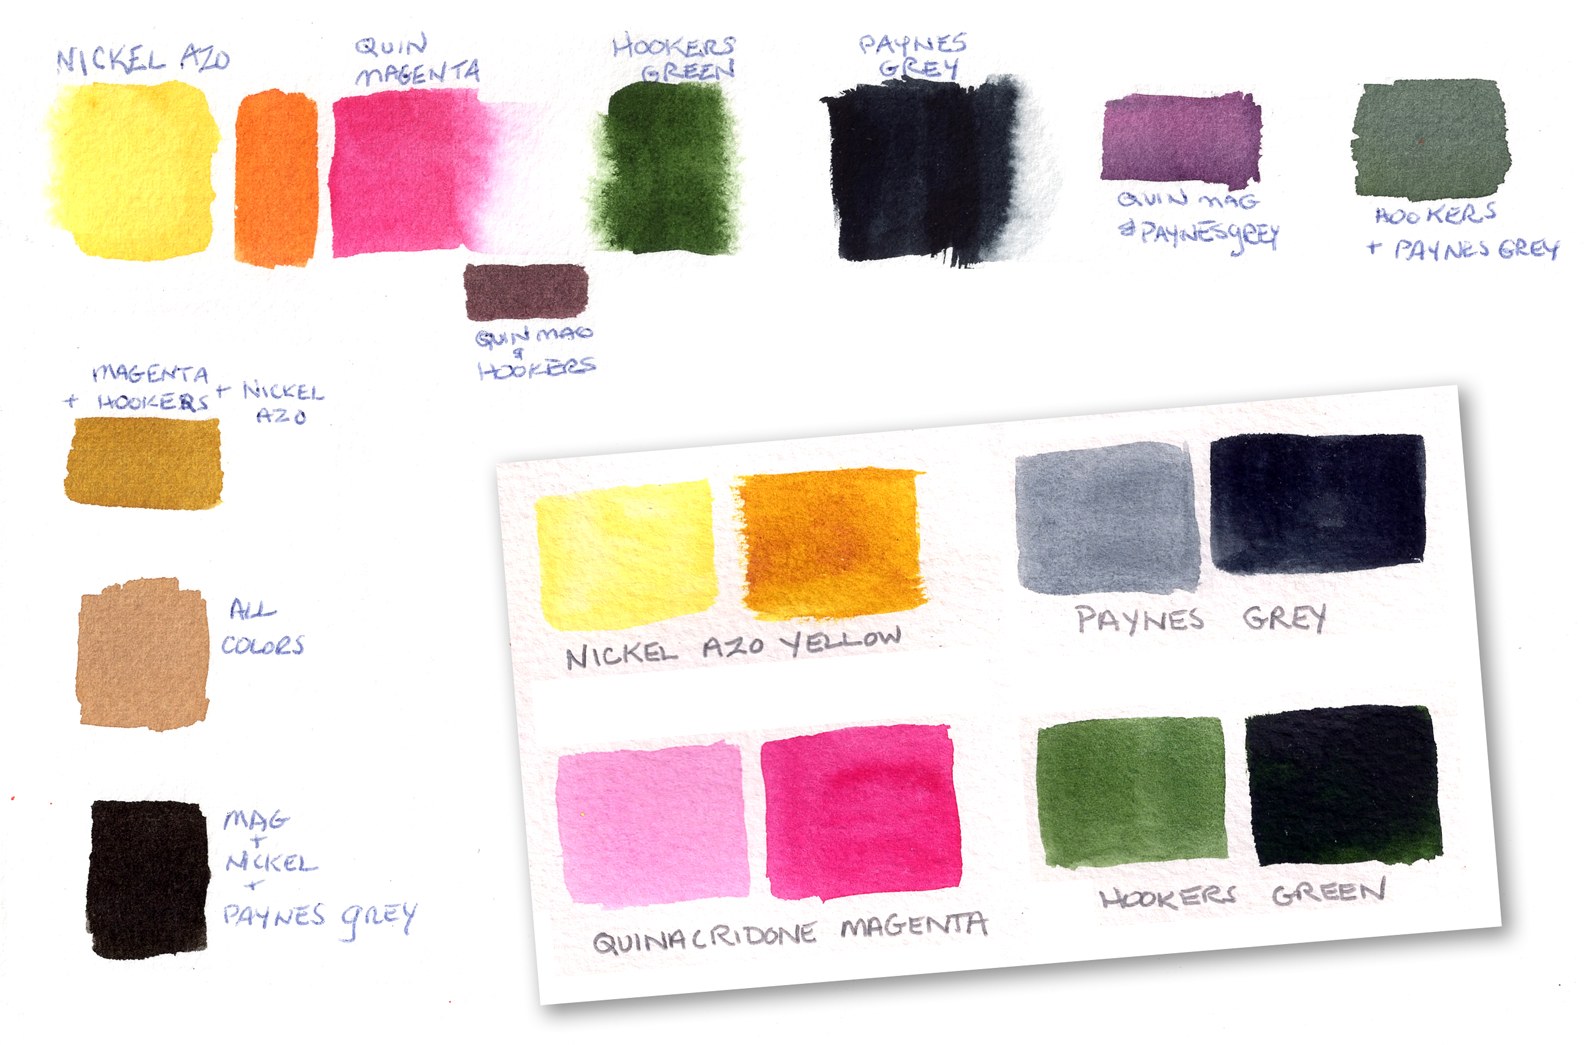
As I’ve said many times, I like painting in watercolors with a limited palette of colors. Often I’ve used three pure primary hues, other times I’ve chosen just two complementary colors. For this painting, I pulled out the Golden QoR® watercolors which I’ve enjoyed using recently and picked three primary colors, but not the usual pure hues I’ve used: red – Quinacridone Magenta; yellow – Nickel Azo Yellow; blue – Payne’s Grey. I tested these colors on paper, each in two different dilutions with water. I decided to add one more color, Hooker’s Green, after successfully mixing it with the Quinacridone Magenta to get the ‘mauve’ tone I wanted for the blanket (complementary colors neutralize each other). Probably I could have mixed the yellow and blue and red to get a similar result, but I took the easier route. The red + green + blue mixed to a rich black, which I knew I’d want to use for the kitten’s eyes. As my sample sheet shows, I tested mixing various combinations of my four colors to create orange, golds, and purple, knowing I’d use these in the painting.
In the initial application of paint to the 9″ x 12″ white scratchboard, I proceeded somewhat as I had when I painted my alpaca “Happy Harley.” where I applied color over the entire surface, loosely following my pencil guidelines. I also used the paint darker – less diluted – than I begin with when painting on watercolor paper. Most often, watercolor paintings start with the lightest values first, but on scratchboard I reverse the order. In “Sweet Dreams” the colors were not random mixes of red, yellow and blue as they were on Harley. Instead, I purposely mixed hues in the palette, to recreate the real colors I saw in the photo. In other words, the mauve tones were applied where ever the bunched-up blanket appeared, and various fur colors were applied to her body – blue in her ears, green on her paws, browns around her neck, warm and cool pinks on her nose and muzzle, dark stripes, etc. Notice how peculiar the green paws look at this stage. Step 1 appears to be a bit loose and messy (especially for the control freak I am), but I painted with my usual planning and strategy, just not precise and detailed at this point.
There are two reasons why I applied strong color initially:
- Lots of the color will be removed in the next steps, revealing the white clay surface of the Aquabord as I create the textures.
- It’s more challenging to add color over color when working on Aquabord vs. on watercolor paper. The pigments don’t get absorbed into the clay surface, so they remain very soluble even when dried. There is risk of disturbing (or removing) a color when painting over it; a relatively dry brush works best when layering colors.
To create the soft bumpy texture of the sheepskin, I knew I could use the characteristics of the scratchboard to remove paint in the light spots and create fuzzy-edged blobs. I began at the top of the painting, using my fat fiberglass brush tool, moving in circular strokes. This worked okay, but there was too much uniformity to the round shapes. I switched to a paint brush dampened with clean water, rubbing away paint in irregular shapes, and blotting off with paper towel. In some areas I wet a q-tip swab and rubbed and wiped similarly. I liked these results better than those with the fiberglass brush, so I did the rest of the blanket this way. I added more paint where there are shadows cast by the kitten’s body and to define the folds and rolls in the fabric. Paint on – wipe off – paint on – wipe off… like the Karate Kid’s waxing lesson!

I’m always tempted to start scratching on the face of my subject or some other focal point, but experience has taught me to get my scratching rhythm going on a less important part of the artwork. Pressure on the x-acto knife can vary from one scratchboard painting to another, somewhat determined by the thickness of the paint on the surface of the clay, so I need to get the feel of the surface where a mistake won’t count so much. I also find less pressure is necessary to scratch through the black ink layer on a black Scratchbord® than on painted Aquabord®. So I began scratching the fur on the kitten’s body, in the lower left. I make my strokes in the direction of the fur; sometimes with short strokes, other times long strokes, sometimes straight, other times curved or wavy; sometimes orderly, other times randomly placed.
Once I had finished creating fur texture on the kitten’s body, I was ready to scratch the fur texture on her head. First I did a bit more painting. You can see the difference from Steps 4 to 5, where I painted in face details, added more color to the neck fur, deepened the shadow cast on her body from the paw on the right. In some places, I used a dampened paintbrush over the white scratches to pick up some of the underlying color and soften the starkness of the scratched white strokes.
I have a variety of Prismacolor water soluble pencils and thought they might be useful for adding more color in small areas. I liked how they worked out. Drawing with the dry pencil added color to the scratchboard surface, but didn’t add the color to the slightly recessed scratches, which was a plus. In places where the pencils made a rough-looking texture, I used a water-dampened brush over the pencil strokes to blend and soften the effect. Note to self: use colored pencils on future Aquabord paintings!
Final touches, signed and sealed… my little kitten is ready to bring a smile to you!


Sella EraQQ
Terima kasih telah mengizinkan saya untuk berkomentar di sini, ARTIKEL ANDA SANGAT BAGUS
WhatsApp : 082161434588
Cara Menang Situs Judi Online ERAQQ
Situs Poker Online
Situs Judi Online Terpercaya ERAQQ
Daftar Situs Judi Online ERAQQ
Login Situs Judi Online ERAQQ
LiveChat ERAQQ
Download Aplikasi ERAQQ
Poker Online
Domino99
Poker
Bandar Poker
Domino99
Bandar Q
Bandar 66
Domino qiu qiu
QQ Poker
Poker QQ
Judi Domino
QQ Online Terpercaya
Situs Judi QQ Online Terpercaya
Unknown
Even with all of those steps outlined meticulously, your art still seems like magic to me! I can't wait to see how people react to this little soft, warm kitten!