An art idea hit me like a bullet one day – how about an alpaca painting? I love painting animals, alpacas are adorable, people love alpacas… I should have thought of this long ago!
A friend had told me about her pet alpacas a while back, so I contacted her and asked if I could visit for photos. Right away, Beth invited me to come by, and we chose a lovely sunny afternoon. Three alpacas were in the fenced area: white Harley, coffee-colored Wylan Jennings, and dark brown Charlie Daniels. Beth explained that her first alpaca was a gift from her husband on their first wedding anniversary (did he not know that paper is the first year gift?!?!). Fortunately, his family had pastured animals, so there was an instant home for their first wooly child.
The three alpacas were willing models, so I shot lots of photos, including some of their farm mate, a miniature donkey (a future painting?). I didn’t even get spit upon, a common habit of alpacas. Later when I reviewed the photos I found several good references for paintings, choosing a front-on view of Harley which looked like he was smiling at me. Had I been commissioned to do an alpaca portrait, I’d be vigilant to paint a realistic depiction, as I do with all my pet portrait commissions. In this case, Harley was serving as my reference for a fun character painting, so I took some artistic liberties. I slightly tilted his head, since body-language studies say “…tilting the head to the side communicates the message that a person is interested in what he’s seeing or listening to…” I think the same can be applied to animals; this tilted head gesture always works on my husband Rick, especially with dogs who know his buttons! Harley’s ears weren’t showing in the reference photo, so I added them, referring to my other photos, because I felt they’d bring more expression to him. I was also planning to exaggerate his smile a bit, and my paint colors would not be chosen to be realistic.

With my recent use of scratchboard, I knew this would be the ideal painting surface to depict the fabulous alpaca fur. My previous scratchboard paintings have mostly been done in a realistic style, so I decided it was time to introduce a new twist. I’ve gotten continuous positive feedback from my bright colorful paintings, and I felt such a palette would make this happy face even more fun and whimsical.
I chose a big 16″ x 20″ white-surfaced Aquabord®, held vertically. As I’ve done on watercolor paper, I began by pouring dilutions of 3 primary watercolors, the same as I used in Eat Chicken and Cow’s In The Corn (Antwerp Blue, Winsor Red, and Winsor Yellow.)
I applied the paints somewhat randomly (‘random’ is not a natural behavior for me!) and allowed them to blend, after putting the stiff Aquabord panel on a level table in our basement, with a drop cloth below it for drips. I sprinkled a little salt in one area to see what that would do to the paint texture. The surface of the Aquabord is unlike watercolor paper in many ways, and paint sits on the surface rather than being absorbed into the fibers. This wasn’t working as it would on paper, but the colors blended nicely as they moved together and I was optimistic… until it dried. The paint wasn’t vibrant and it looked gritty and dirty in the textured surface of the Aquabord. Yuck, I didn’t like it. A failure before I even got started.
No reason to fret; I already had Plan B…. A wonderful characteristic of Aquabord is that, when using watercolors, you can easily remove the paint. In fact, I held the panel under the faucet in my big laundry sink and simply washed away all the watercolors. Hoorah, I was happy to see the paint run down the drain! The fine clay surface didn’t go back completely to pure white – the red paint left a hint of stain – but it was ready for me to start over.
This time I used the same three primary colors, diluted a little but still very saturated, and I painted directly on the Aquabord, using a different brush for each color to keep them pure as I applied the paint. I covered the entire panel at once, without letting the colors dry individually, so they could blend, as the green in the top left shows. I purposely laid each color while visualizing the composition I already had planned, in which I had blue sky, foliage, and a bit of landscape around Harley’s body. For the alpaca himself, I painted the brightest, boldest colors. Harley’s white fur had lots of yellow undertones, so the warm yellow, red, and orange tones worked well to define him. I intentionally planned for the right side to be in shadow, so I directed stronger reds and purple blends there.
It is important to get a initial bold application of color – but not thick or heavy – onto the Aquabord for a couple of reasons: (1) In subsequent steps, scratching and removing the paint to reveal the white layer of clay is the prime asset of using this surface, and (2) on Aquabord it is not so easy to paint wet color over dry color, as you can do when working on paper with watercolors. Since the paint sits on top of the white clay surface, every application of wetness lifts the color already there, just as I washed away the paint under the faucet. It is possible to paint subsequent layers using the “dry brush” technique, which loads the brush with pigment versus with water. Blotting the moisture off the loaded brush before applying the paint helps avoid disturbing existing color too.
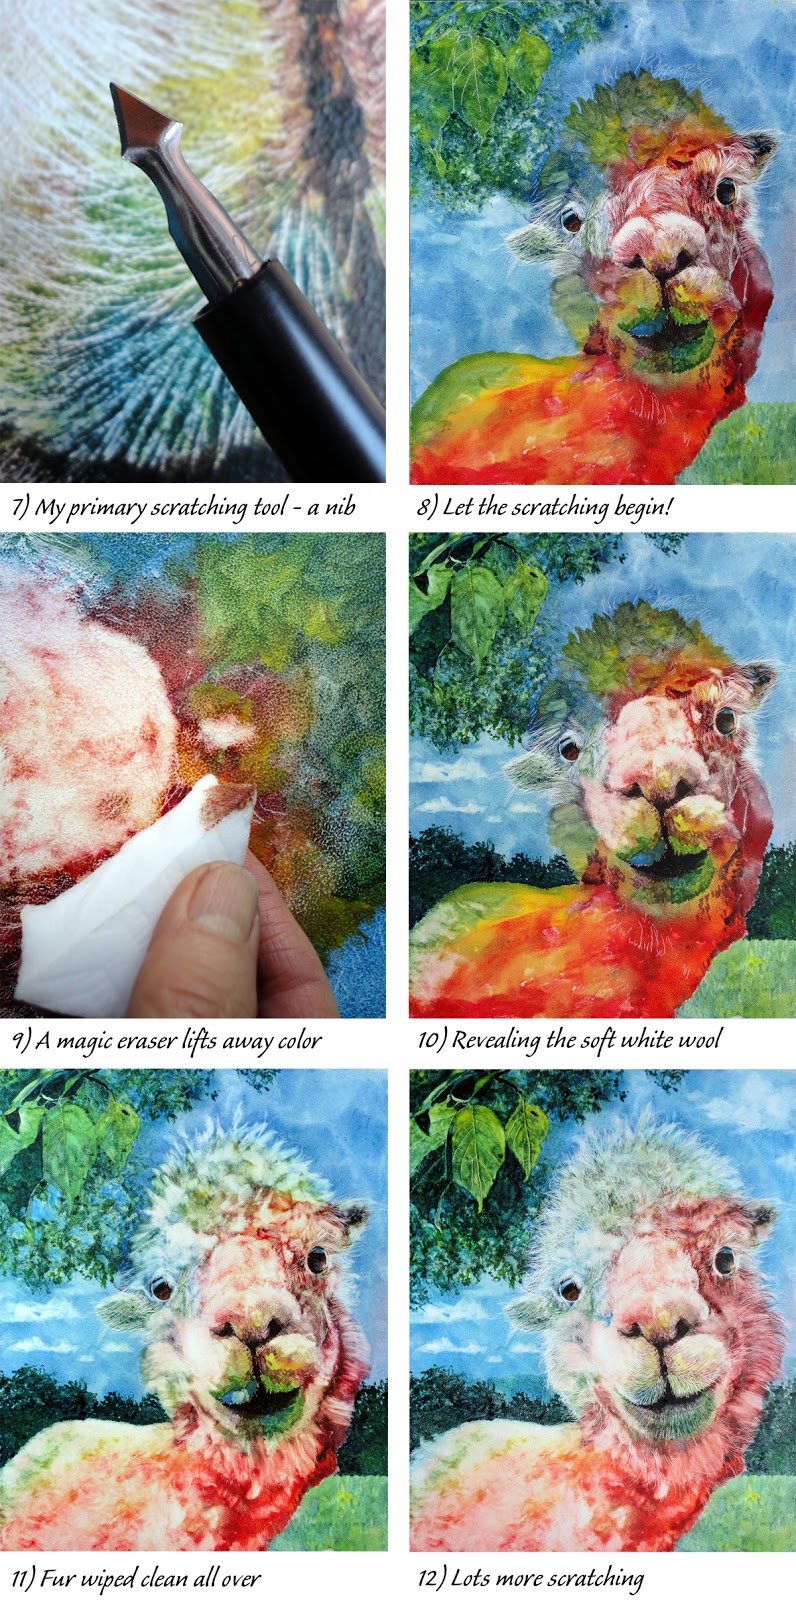
My step-by-step photo #4 shows the fine white lines from tracing with white graphite paper to transfer my drawing to the painted panel. (NOTE: you can click on the images to see them larger.) For some reason, black graphite paper tracing wasn’t showing up over the paint. As usual with my animal portraits, I began painting details with the eyes. Harley’s were dreamy, with lovely reflections. His eyes, nostrils, and mouth would be the darkest areas in my finished painting, and establishing the darks early in a painting helps guide the rest of the values. Using dry brush techniques, I painted middle values where needed, matching or naturally blending with the hues I had already laid down, as you can notice from Step 5 to Step 6. For example, when I saw I needed to extend the height of his head and his face on the left where my panel was painted blue, I added blue + yellow = green. This blended with the blue already on the surface as I applied the mixed green paint, while differentiating the color of the animal from the background. For the most part, I got the bulk of the painting done before doing any scratching or other removal of paint.
I tried using an x-acto blade for Harley’s finest fur, but found the tool was a bit weak for the effect I wanted. So I switched to another scratching tool in my arsenal, an arrow-shaped Speedball nib which is sold as a scratching tool. It’s a thicker and harder point than the x-acto blade, and I was able to control it well. I have a second Speedball scratching nib with a curved hard blade, but I liked the straight point of this one. Notice how my scratching is done in the direction of the fur, such as the long curving strokes around the fluffy edges of Harley’s head and the short straight strokes for the fur around his mouth.
Where the wool coat was softer, bunched together, and showing fewer individual hairs, I decided I needed to wipe away the paint to reveal the white clay surface below. Scratching would have taken too long and would have scribed lines into big sections of the white clay surface which I’d prefer to leave smooth. I got the notion to try using a Mr. Clean Magic Eraser, known for its ability to lift watercolor off a painted surface. I cut one of the sponges diagonally into wedges, dampened a piece and wiped away – it worked perfectly. I kept rinsing the sponge in clean water to be sure I wouldn’t apply color instead of removing it, and worked all around the fur. At the top of Harley’s head, I wiped with curved motions to mimic the hair growth, using the point of my cut sponge. (Note how the closeup of the painting surface in Step 9 shows the texture of the Aquabord surface, with little hills and valleys.)
Simultaneously, I worked on the green foliage in the top left and the landscape background. I wanted the leaves to balance with Harley’s face, but not compete for attention. I scratched down to white for the veins of the leaves, but then painted over those lines to soften the contrast. As I worked over the leafy area, I tried to create “lost edges” so they weren’t sharply defined. I also wanted the background to be dark enough so the white fur would contrast dramatically. In the last two work-in-progress photos, you can see the difference which scratching made in adding final details. I widened Harley’s face with more paint and more scratching. On his body, I left out any details and just made the colors softly blend, to try to visually push that back into the distance. Careful scratching and color application around his mouth helped emphasize Harley’s smile!
The first few people to see this painting have reacted with a chuckle, and that’s just what I aimed for. I’ve decided to use Happy Harley as the “poster child” for my upcoming solo show, so he’ll have a place of honor on display from April-June. (Details will be posted here soon.) I’ve christened this as my first alpaca painting, and I look forward to doing more… as soon as these other “art ideas” stop popping into my brain!