After working in watercolors for recent months I've been anxious to switch over to scratchboarding again. I was inspired to create an image with various stages of the wild thistle plant, so full of a variety of textures. Using Photoshop, I combined a couple of photos I had taken of wild thistle growing near my house. Thistle is a plant which often has several stages of growth showing at once, including spiny flower pods, fully opened flowers, and the delicate silky down which floats the seeds on a breeze. Did you know that goldfinches have a special relation with thistle? They love to eat the seeds (sold commercially as niger bird seed) and use the soft down to line their nests.
The thistle flowers are a lovely shade of purple but I chose to do this scratchboard without added color, challenging my scratching techniques to depict a full range of values from white to black. My photo collage indicates how I progressed, working on an 8"x8" black Scratchbord™ panel. In this square format, I designed a composition with an inner circle with a focus on the plant and a subtle background outside the circle. The fine details of scratchboarding make it a slow process, but it can be a meditative one at the same time.
Close-up photos below show the tiny white marks I make into the black scratchboard surface, revealing the white clay layer below. My pressure is very light as I scratch, so you wouldn't even feel the scratches as you move a fingertip over the surface. The more scratches, the more white is revealed. The closeness of the scratches, whether in one pass or layers of scratches over scratches, helps create the appearance of shades of grey. More scratches, lighter values.
I used various scratching tools, including several types of tattoo needles. The tattoo needles are helpful since the tiny multiple needles scratch several fine lines at once. There are different arrangements of the needles, as my close-up photo shows; some are in a circle (like the one at the top), others are flat with differing numbers of parallel needles with a rounded, angled, or squared-off tip. It is fun to test each and discover the various marks they make. I also used an x-acto #11 blade, a #11 surgical scalpel, a pointed etching tool, and the Ampersand™ scratch knife (which makes a single line a bit thicker than the #11 blades). You can read more about my scratching tools and links to sources on my earlier blog post "Scratchboard 101."
In the background I had thought about scratching the fabric of a tartan plaid, since thistle is the national flower of Scotland. After printing a tartan in black and white I discarded the idea - it would require a lot of precision, many of shades of grey, and a whole bunch of time! Instead I chose to make a random texture which wouldn't compete for attention with the flowers. I used a small piece of Ampersand's very fine steel wool, rubbing it gently in circular motions to the edge of blue masking tape which I applied to the panel to protect my inner circle.


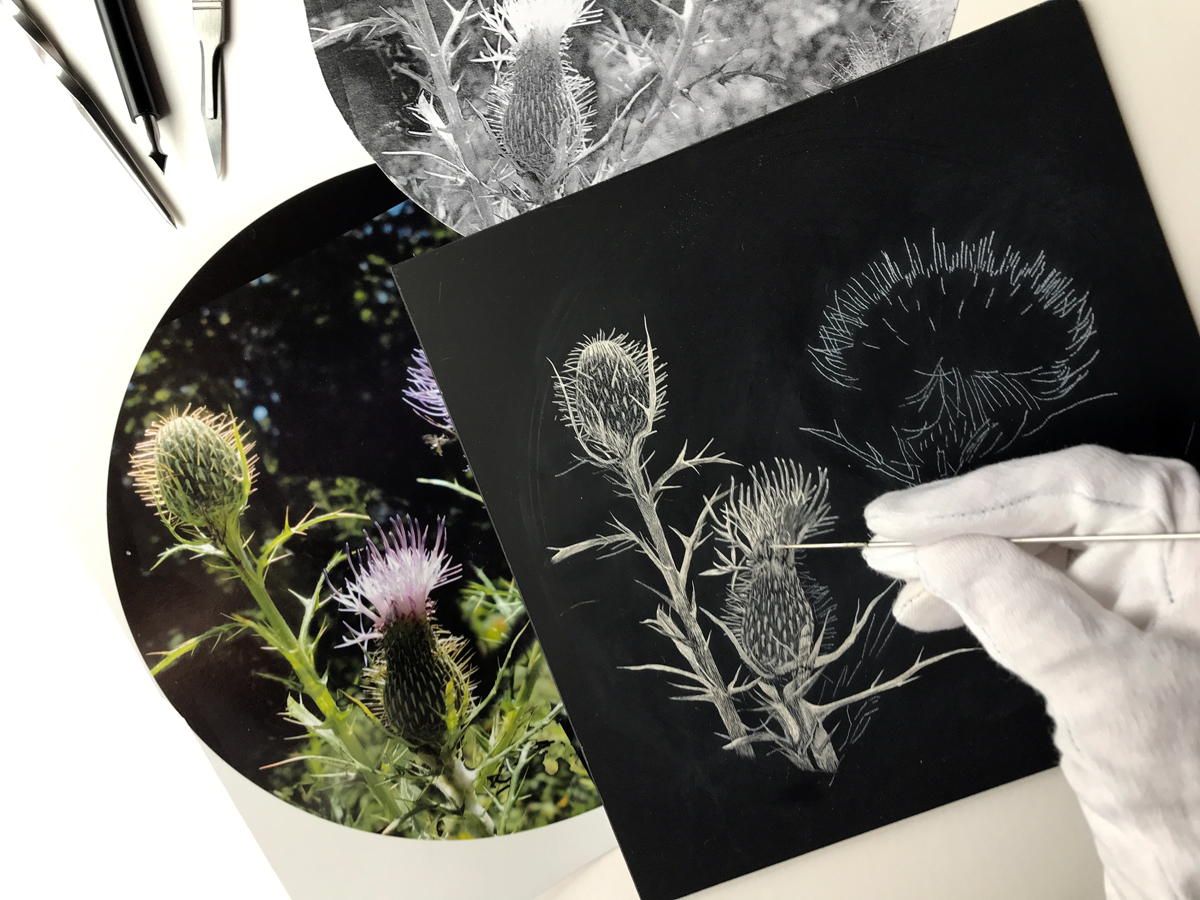
The photo of me working on this piece shows how I worked with both a color reference photo and a black and white print.... the latter helps me visually translate the image into black, white, and grey values. While working on the scratchboard, I wear white cotton gloves to prevent oil from my skin rubbing onto the panel surface. For this photo I was using the round-tip tattoo needle tool and you can clearly see how tiny it is!
When I removed the blue masking tape, the solid black background in the flower circle seemed too stark, as shown in #9 in the photo collage. As a final step I lightly scratched some random spots, suggesting distant light filtering through heavy vegetation. I loved the delicacy of the seed fluffs so I added a few more tufts here and there and declared the artwork finished.