Scratchboard Art in Less Than 90 Seconds

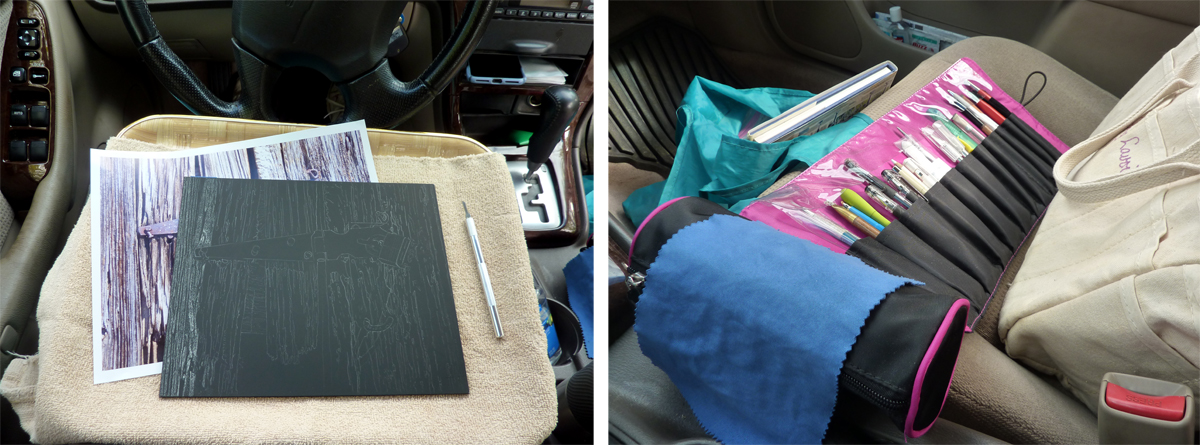
Through the wonders of technology, here's a quick time-lapse of the creation of my new scratchboard "Locked In Time." 'Hard to believe that it took weeks, not seconds, to create this artwork! Learning to add a mini-video to my blog is one of my many quarantine-time activities. Perhaps I'll get more adventurous (and better) in the future and maybe even add audio.

Click on the photo to launch the slide show.

closing image of the video

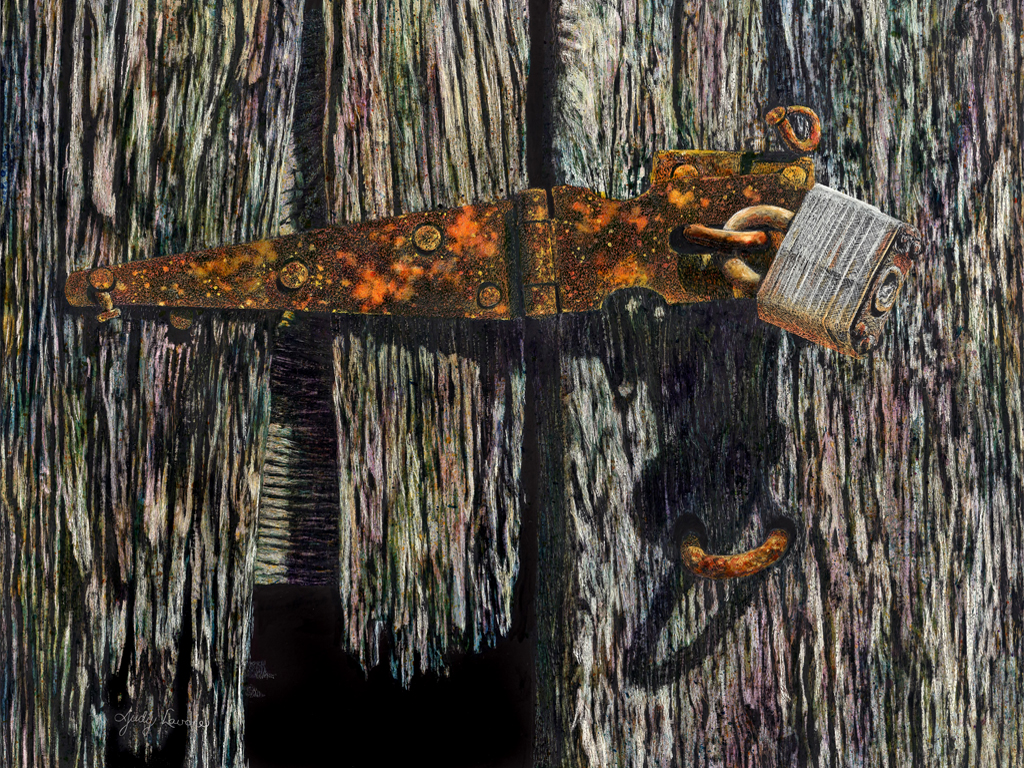
Click this image to see the time-lapse creation process

On this 10" x 8" panel I aimed to incorporate new scratching methods and tools that I've been introduced to recently, particularly since my acceptance as a member of the International Society of Scratchboard Artists. I gained access to a library of how-to videos and witnessed the amazing detail achieved by making very very tiny dots and scratches through the thin black surface to reveal the white clay layer below. These techniques were different from some I had been using and introduced new ways to get great contrast, a huge range of values, and intense detail. I was ready for a test-drive.
Title for "Locked In Time"

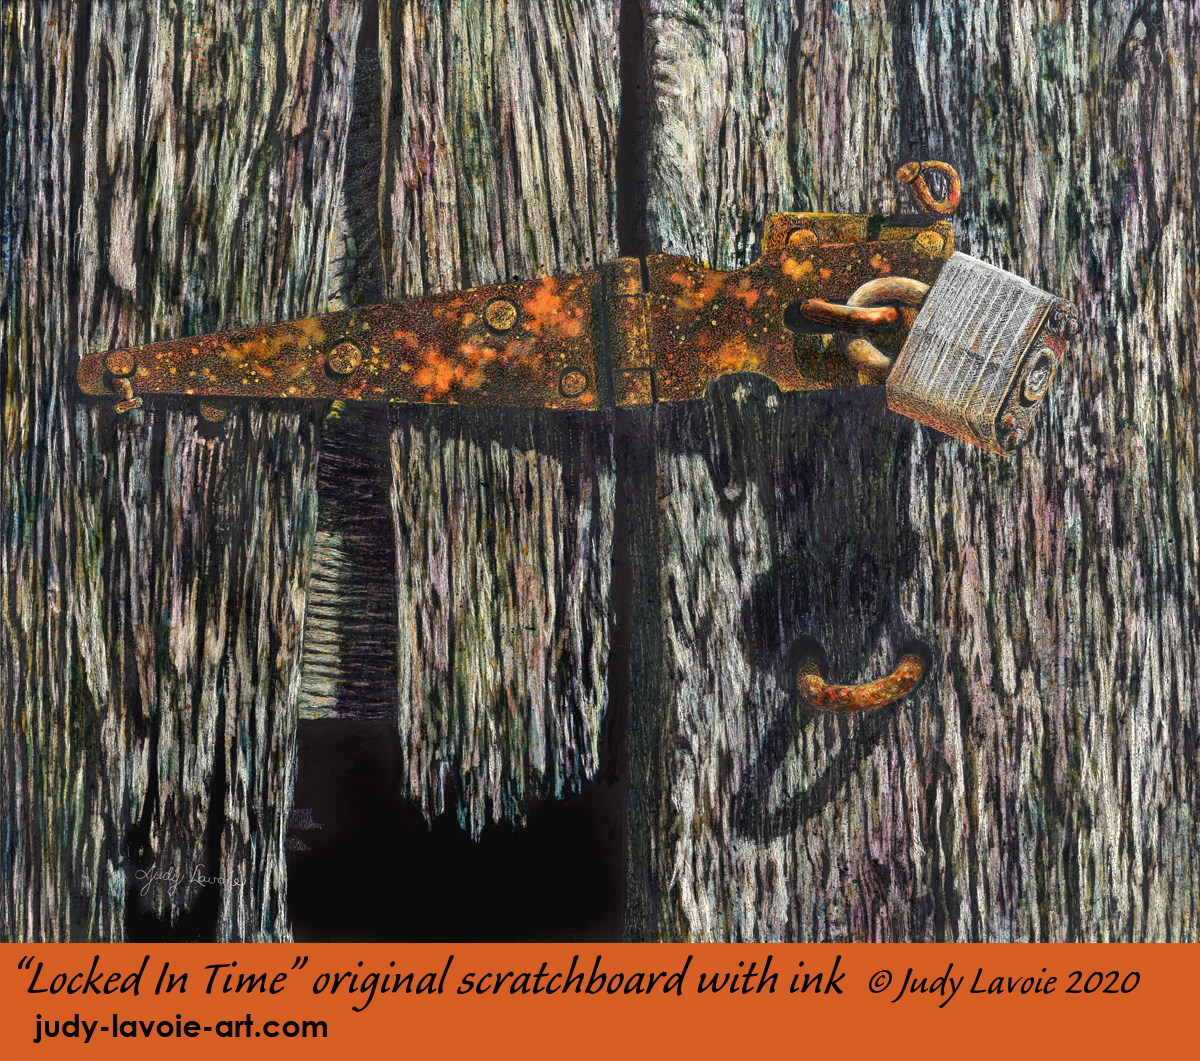
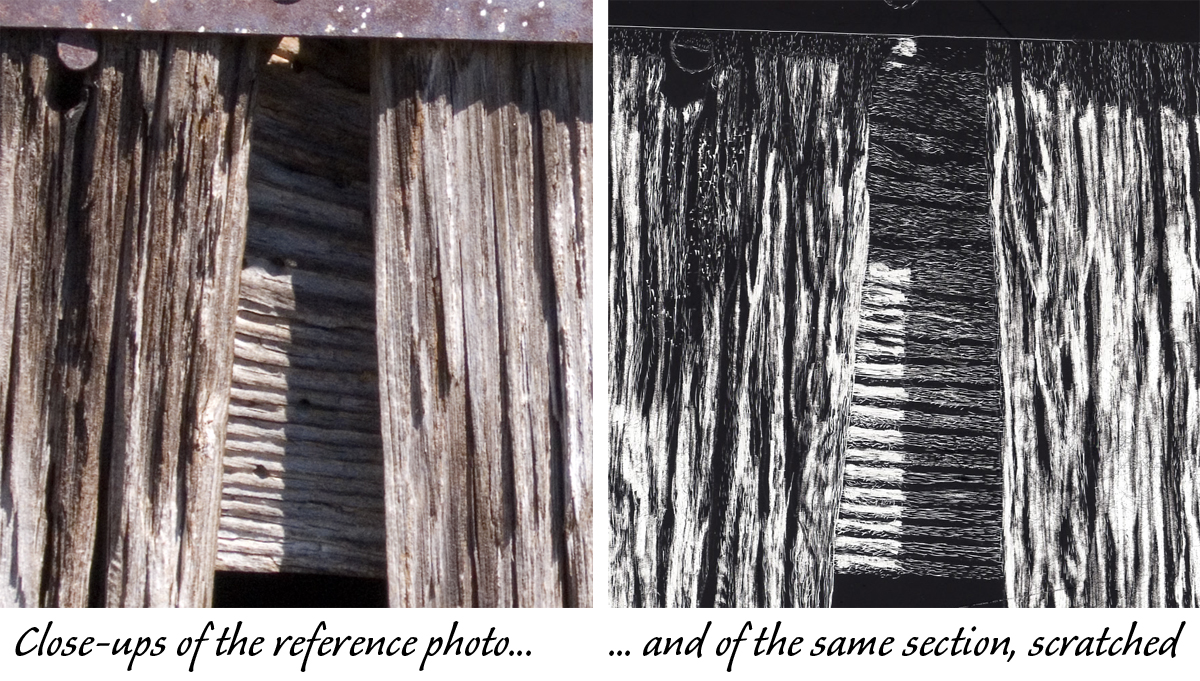
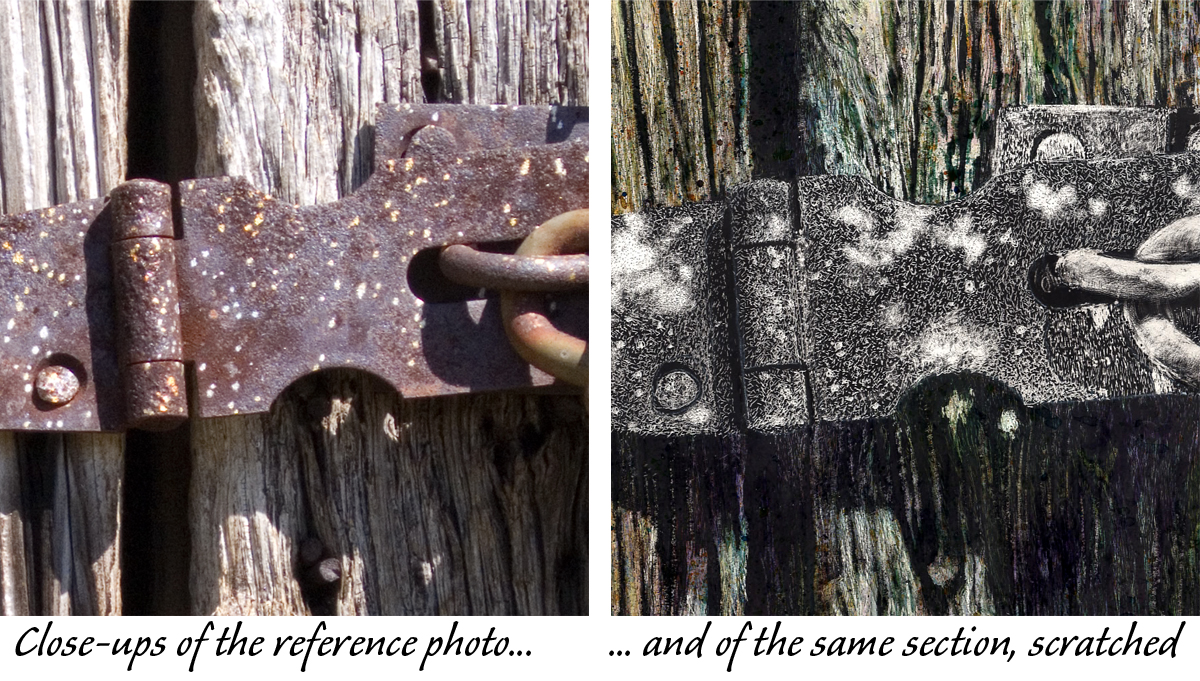
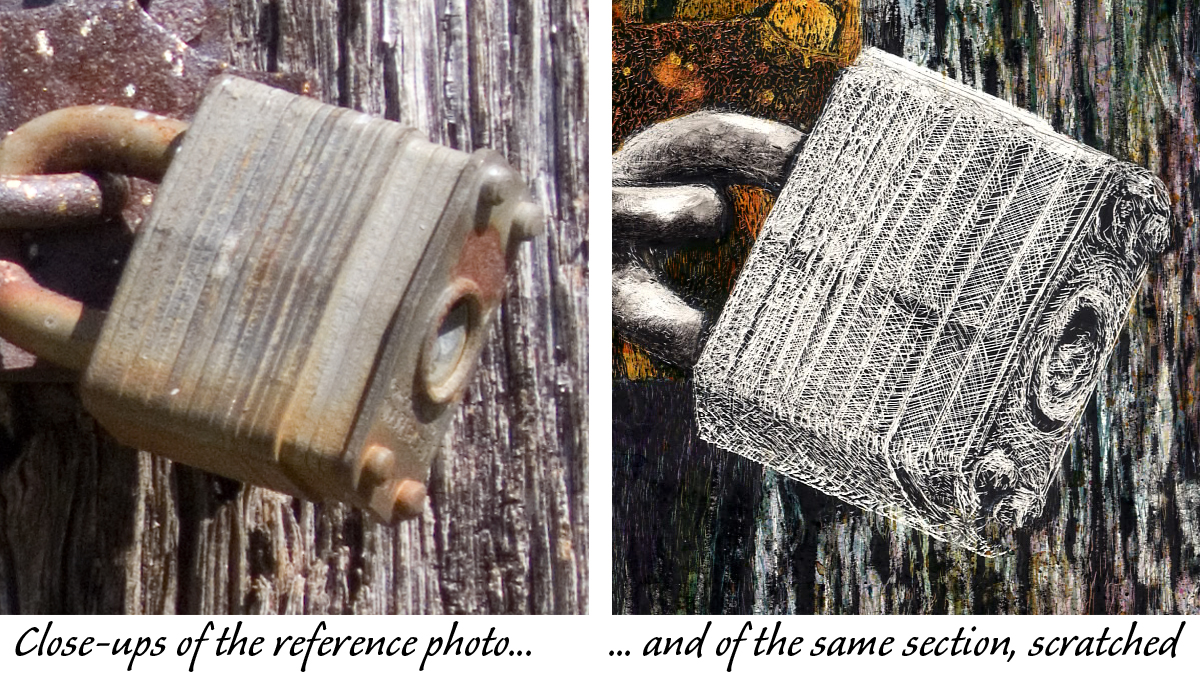
Scratchbord™ is the perfect surface for depicting rich textures such as old wood and rusty metal. I don't remember where I took the reference shot I selected or this artwork, but it was in my painting photo file, dated 2008. I liked the range of dark-to-light values, cast shadows, twisted and bent nails, and the darkness between and behind the old barn boards. I knew it was the ideal candidate for my newest scratchboard adventure, where I could use a variety of scratch marks to create white to black areas with lots of grey values in between. Even before I began, my vision was to incorporate strong color in the artwork, exaggerating what the photo showed. I know from my previous scratchboard work that you have to get the values right first, then keep added color very transparent.

Title for "Locked In Time"
Working on scratchboards presents a few advantages to me as an artist when compared to painting with watercolors or acrylics on paper or canvas. With the black panel and a few tools, I can easily work on my art just about anywhere… no need for paints, brushes, water, etc.  As an example, I started "Locked In Time" in the front seat of my car! My husband Rick was having cataract surgery and I was not allowed in the building due to COVID-19 protocols. I never have a problem finding ways to keep busy, so I packed my art sack with all I would need to start this piece while waiting in the car. I put a pillow on my lap to rest a tray at a comfortable height and laid a towel to catch the black dust which comes from scratching the surface. With the seat moved all the way back from the steering wheel, my reference photo and art panel (onto which I had already transferred my drawing with white graphite paper) rested on my makeshift art table. On the passenger seat I had more scratching tools than I needed, packed in the make-up bag I've employed to keep them organized and portable. I never expected to wait so long, but Rick's procedure didn't start on time. I ended up getting lots done on the wood texture after spending 4 hours in the car!!

As you can see in my short video, I tackled the wood surface from left to right, working around the black areas between the boards, and keeping the hinge, lock, and other hardware untouched. The shadows on the wood were scratched too, but with finer and more sparse scratches to create darker values. I made my strokes in the direction of the wood grain, and went back and forth over the panel several times in order to create the range of values which would make the worn grain look three dimensional.

wood reference photo and scratching close up
I decided to add color to the scratched wood, not the greys and browns of the real barn but a variety of cool hues. I put blue masking tape over the big black areas I had already preserved, to make it easier to avoid getting the colored inks in those areas. I used very transparent Ampersand Arts Clayboard Inks, which have the advantage of not leaving color or a film if they get on black areas, but I still preferred to keep those unscratched black sections pristine. Over my scratched barn wood I painted and spattered mixtures of cool blues, greens, purples and yellows. I applied more color that I wanted to end up with, knowing that I would be eventually be scratching much of it away to add lighter values. The scratching left mostly just a hint of color, but made the wood surface more interesting than merely shades of grey.
hinge reference photo and scratching close up
Next I removed the masking tape and re-traced my guidelines onto the hinge and padlock from my original drawing, using white graphite paper again. I played around with various scratching tools to add lots of different textures to the old rusty hinge, making small "stipple" dots and uncovering irregular light patches with a fiberglass brush. It was a very slow process - not like the magic of the video - but it created an interesting rough texture on the black scratchboard surface. With the addition of inks mixed as bright warm orange, red and yellow shades, my vision continued to evolve.
reference photo of the padlock and scratching close up
I think I left the padlock to the end because I didn't know how I'd do it! In the reference photo it appeared to have lots of linear ridges, so I tried to mimic that, primarily using fine crosshatching with an x-acto blade and straight lines scratched to pure white. It looks quite messy when enlarged! Minimal color was used on the lock to add a bit of rustiness and also give it three-dimensionality.

After declaring my scratchboard finished and allowing ample time for the inks to dry, I used a fine black pen to put small dots in places which I thought were too light and to touch up small white specs I might have created by accident in the blackest areas. I like using Pentel Arts Hybrid Technica or Pigma Micron black pens for this step. Once dry, I softly wiped the surface with a very lightly dampened cotton cloth one more time to remove any fine residue left from the scratching process.

An archival coating over the finished work protects it from dirt, moisture, UV discoloring and, almost magically, unifies the surface and makes black marks blend into the original factory surface of the black scratchboard. I do several coats of Krylon® Gallery Series UV Archival Varnish Spray, available from art suppliers not your nearby hardware store. I favor the satin finish, but I start with a first coat of their matte finish. Some scratchboard artists prefer a brush-on clear coating, but I like the spray. Finishing these Ampersand Art scratchboard panels this way allows them to be easily popped into a frame with no need for a mat or glass over the surface.

"Locked In Time" is one of my accepted entries into the 2020 International Society of Scratchboard Artists Annual Exhibition, so my hard work has been rewarded!