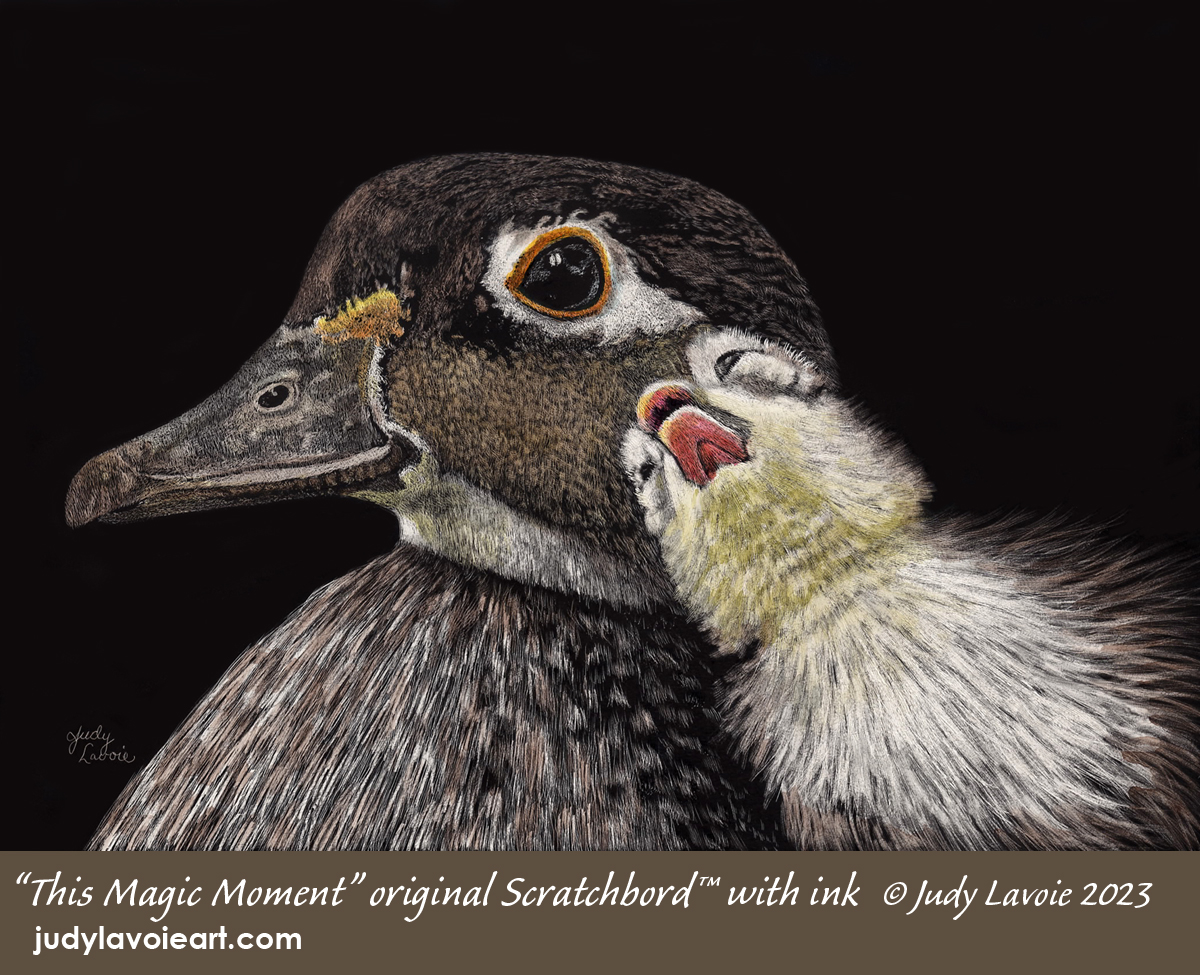
It was love at first sight when I saw my friend Tammy Kokjohn’s fabulous photo of a mother duck and her ducklings. One little babe had was cozied up to mom’s neck, looking like he was serenading her. I knew it would make a lovely painting and immediately added it to my list of future scratchboards.
I’ve been on a roll with scratchboards of birds, and this subject lends itself well to the texture and detail possible with scratchboarding. I chose a 7”x5” Scratchbord™ panel and decided to crop the reference image tightly on the area which most inspired me.
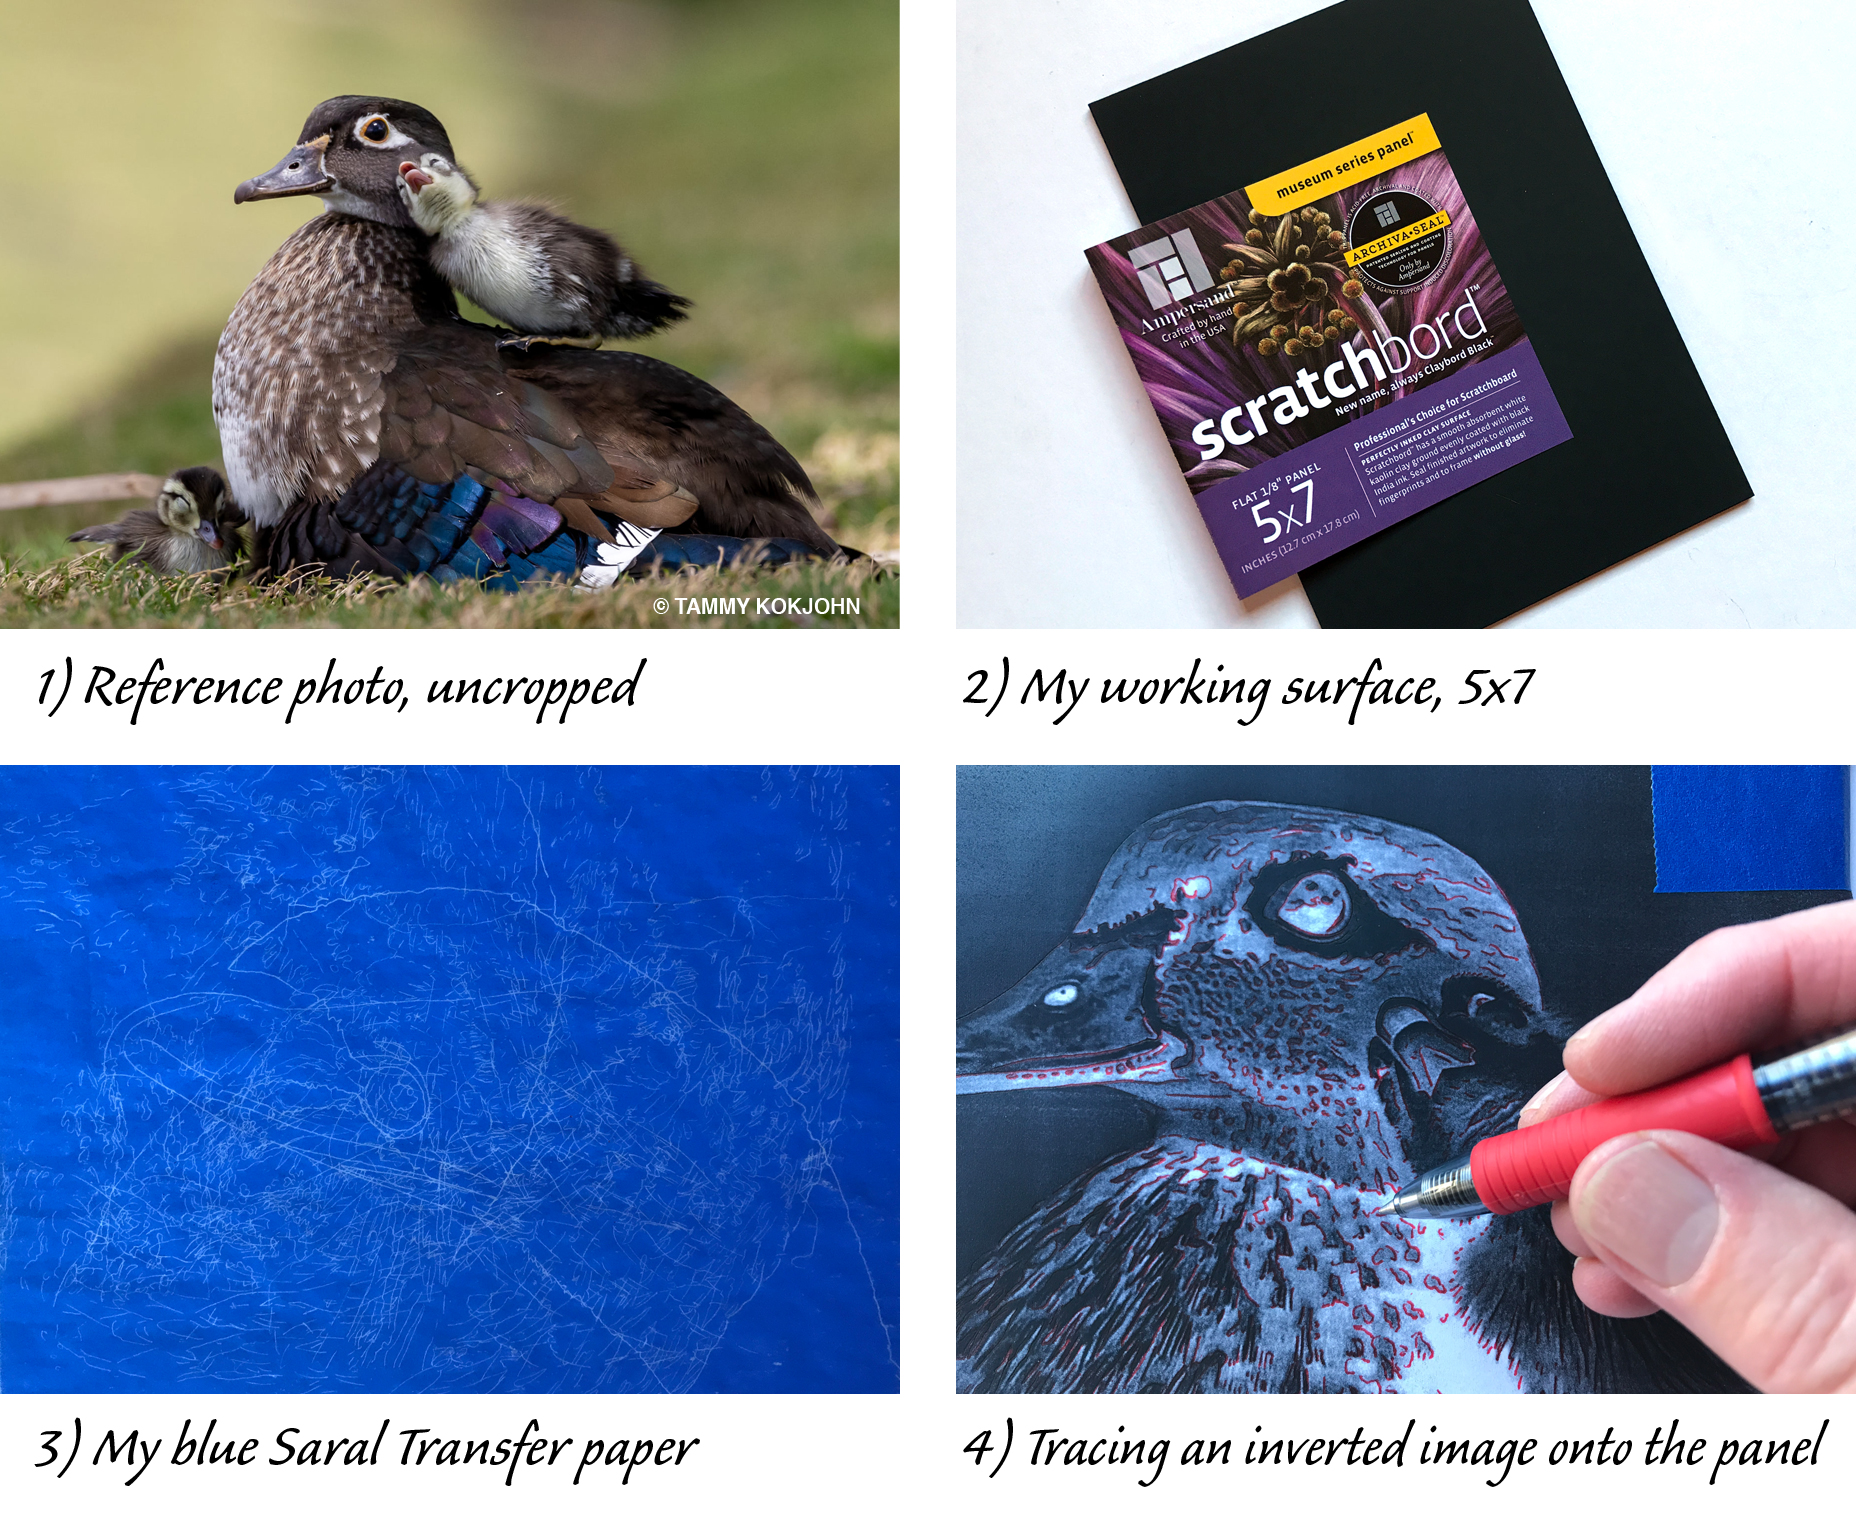
Narrowing in on the baby duckling and the mother’s head would tell exactly the story I wanted, of total love. As tempting as it was to scratch the big duck’s whole body of feathers, including those amazing iridescent colors of the lower body feathers - and the second precious duckling on the ground - I felt the close vignette would be more visually effective.
After cropping and sizing the photo to 7”x5” in Photoshop, converting it to black and white, and inverting the image to make the contrasts more visible, I was ready to transfer it to my black panel. I use Saral transfer paper, which works like old fashioned carbon paper. I have used white Saral, but it sometimes made it confusing when I was scratching. The graphite Saral is favored by some and I have used it a lot, but sometimes you need to shift the lighting around your panel to see where the pencil-like lines are. Saral also comes in yellow, red, and blue, and I use all three of these with equally satisfactory results. You can see in photo #3 that I use the same transfer paper many many times before discarding it! The transfer lines are erasable with a kneaded eraser, but many disappear as you scratch over them. I hinge my photo reference to the back of my Scratchbord panel with blue masking tape, and place the transfer paper underneath, frosty side up. I like to use a red Pilot G-2 pen to trace the major values, because it shows where I have already traced - as opposed to tracing with a pencil or black pen. Photo #5 shows my blue guidelines on the scratchboard surface.
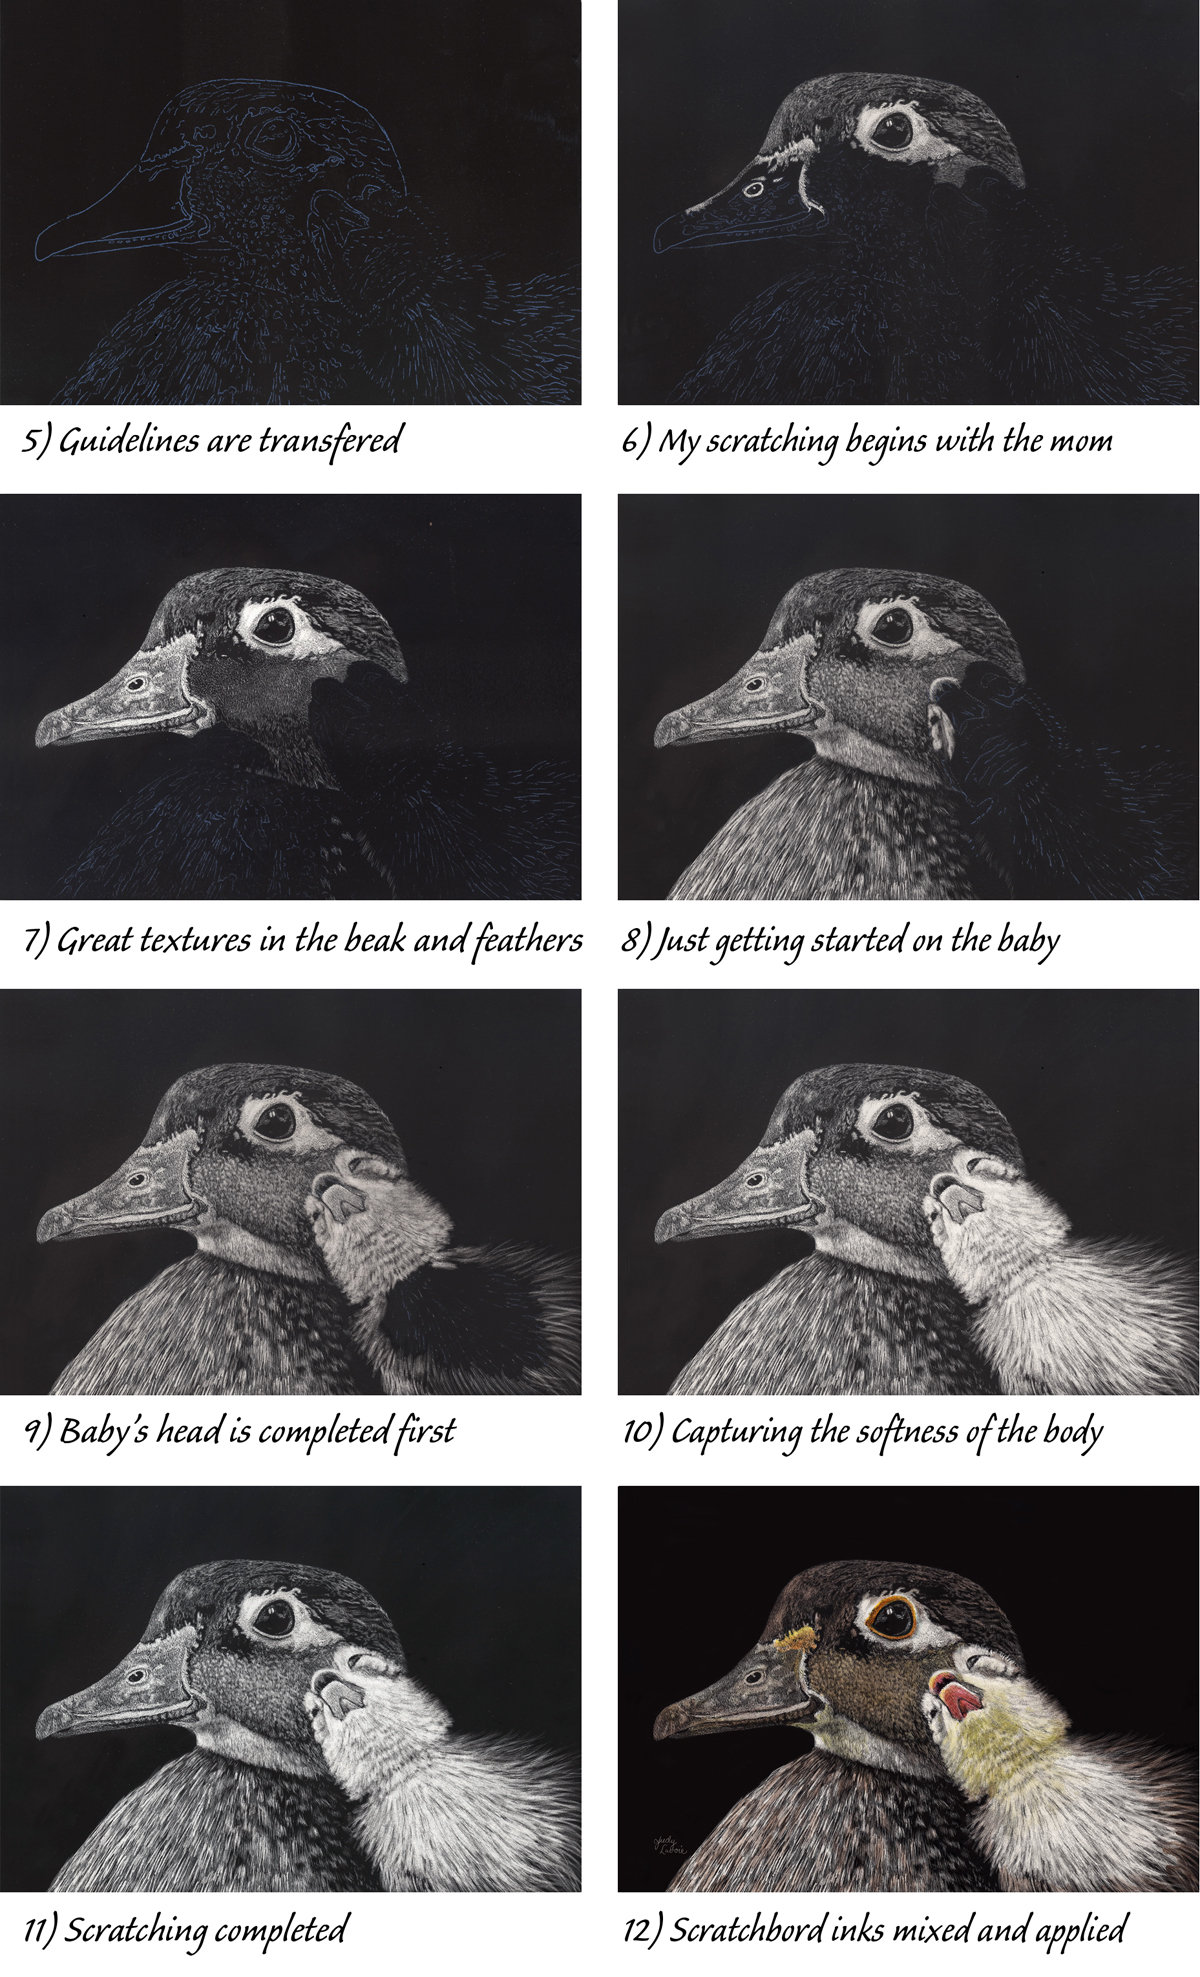
I’m not very consistent about how I work a scratchboard, but I try to start in a place which is not real critical - just to get my scratching motion going. Also, I love to work on the eye, but I resist working on them until I’m ‘warmed up.’ The baby duckling’s head is my focal point, so I worked the mother first, from the top down. Additionally, I hold off on scratching the lightest whites initially. Scratching the black surface creates a fine black dust and sometimes this seems to “grey” areas already scratched.
It only takes a light touch with an X-acto knife or other scratching tool to remove the black ink surface. In fact, running your fingertip over a scratched area and an unscratched area of the surface should detect no more than a minimal difference. With Ampersand Scratchbords you can lightly scratch over the same area many times, uncovering more of the white clay layer below.
If I aim for mostly grey tones in my scratching, I can scratch more later to lighten them. I learned long ago from my watercolor paintings that the area you want to draw attention to should have your darkest darks and lightest lights (the most contrast, in other words), so I wanted to make the baby duckling - my focal point - to be the lightest, just as Tammy had captured so perfectly in the photo.
This Magic Moment is a small piece so I kept my scratch marks very fine. The feathers on the mother duck’s head are short and I primarily scratched these with little hatching strokes (parallel close lines) and stippling (fine dots). Stippling is especially good to capture the textures of a beak and highlights in the eye. The feathers on the big duck’s breast are longer and more coarse, and longer hatching lines worked best there.
For the baby’s body I used a fine fiberbrush for initial scratches, which creates a softness. I scratched over this with a sharp #11 blade in an x-acto knife, and used the fiberbrush to make the finest lines of fluff off the baby’s back. I stippled the beak and mouth with very fine dots. Notice how the beak in photo #11 is a little lighter than in #10; I planned to add color and the Ampersand Scratchbord inks are more vibrant over lighter areas where the black layer has been scratched away. Adding color is most often one of my last steps in a scratchboard project. Before painting anything on the board, I make sure the surface is very clean of scratching residue. I use various tools, like a very soft clean makeup brush or a “Swiffer” dust rag (with no added cleaners on it). I also make sure all my original guidelines have disappeared as I scratched, rub them off with a kneaded eraser (which also picks up the black dust from scratching) and/or covering them with a fine black Pitt pen. I do this because the added color, whether ink or watercolor or other media, will seal the surface, making any residue stick permanently and any remaining transfer lines impossible to erase - I speak from experience!
In adding color to a scratchboard, it needs to be transparent, so all your fine scratching will not be covered over. The Ampersand inks are my favorite way to add color to a scratchboard, and they come in a set with red, blue, yellow, green, sepia and black. In addition to being beautifully brilliant and transparent, Ampersand formulated them so that they do not show if they are painted on an unscratched area, as might happen with watercolors or other types of inks. I create the hues I want by mixing them, as I do with other media like watercolors or acrylics. The inks are water soluable so they can be diluted to lighten them, and they dry waterproof and permanent. I tend to mix very small amounts of these inks at a time since they dry faster than I am accustomed to with watercolors and they are very concentrated. When the ink dries, I can layer more of the same color or another color over it. I can also scratch through the dry colored sections, which often increases the dimensional appearance. The black ink, also called “Black Repair,” matches the black used on the Scratchbord surface, so it is possible to retouch any mistakes or accidental scratches to correct them. When diluted, the Black Repair can also be used to darken a scratched area where you scratched the value too light. It can be a lifesaver! Note: the black surface of Scratchbord panels will dilute with alcohol, so never use alcohol inks as colorants.
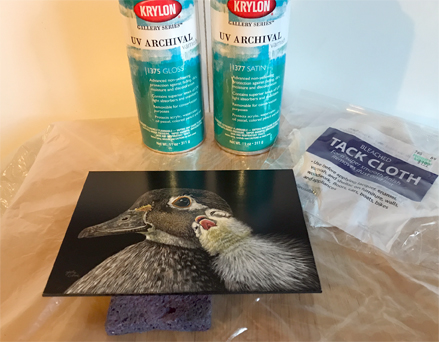
I love that scratchboards can be framed without matting or glass. To seal and protect the surface I use a clear spray finish. This coating also conceals touch-ups with Black Repair and over-painting black areas with any Scratchbord inks. I use Krylon’s UV archival sprays which come in matte, satin, and gloss finishes. When my panel has dried thoroughly from any inking, I clean the surface of residue, dust, etc., gently wiping with a clean tack cloth. I pay close attention to the temperature and humidity instructions on the spray can. I typically spray 3-4 coats of gloss, drying in between, then 2 coats of satin. I like the satin finish, and I have read that too many coats of only satin sometimes causes cloudiness. My layering with gloss seems to avoid this.
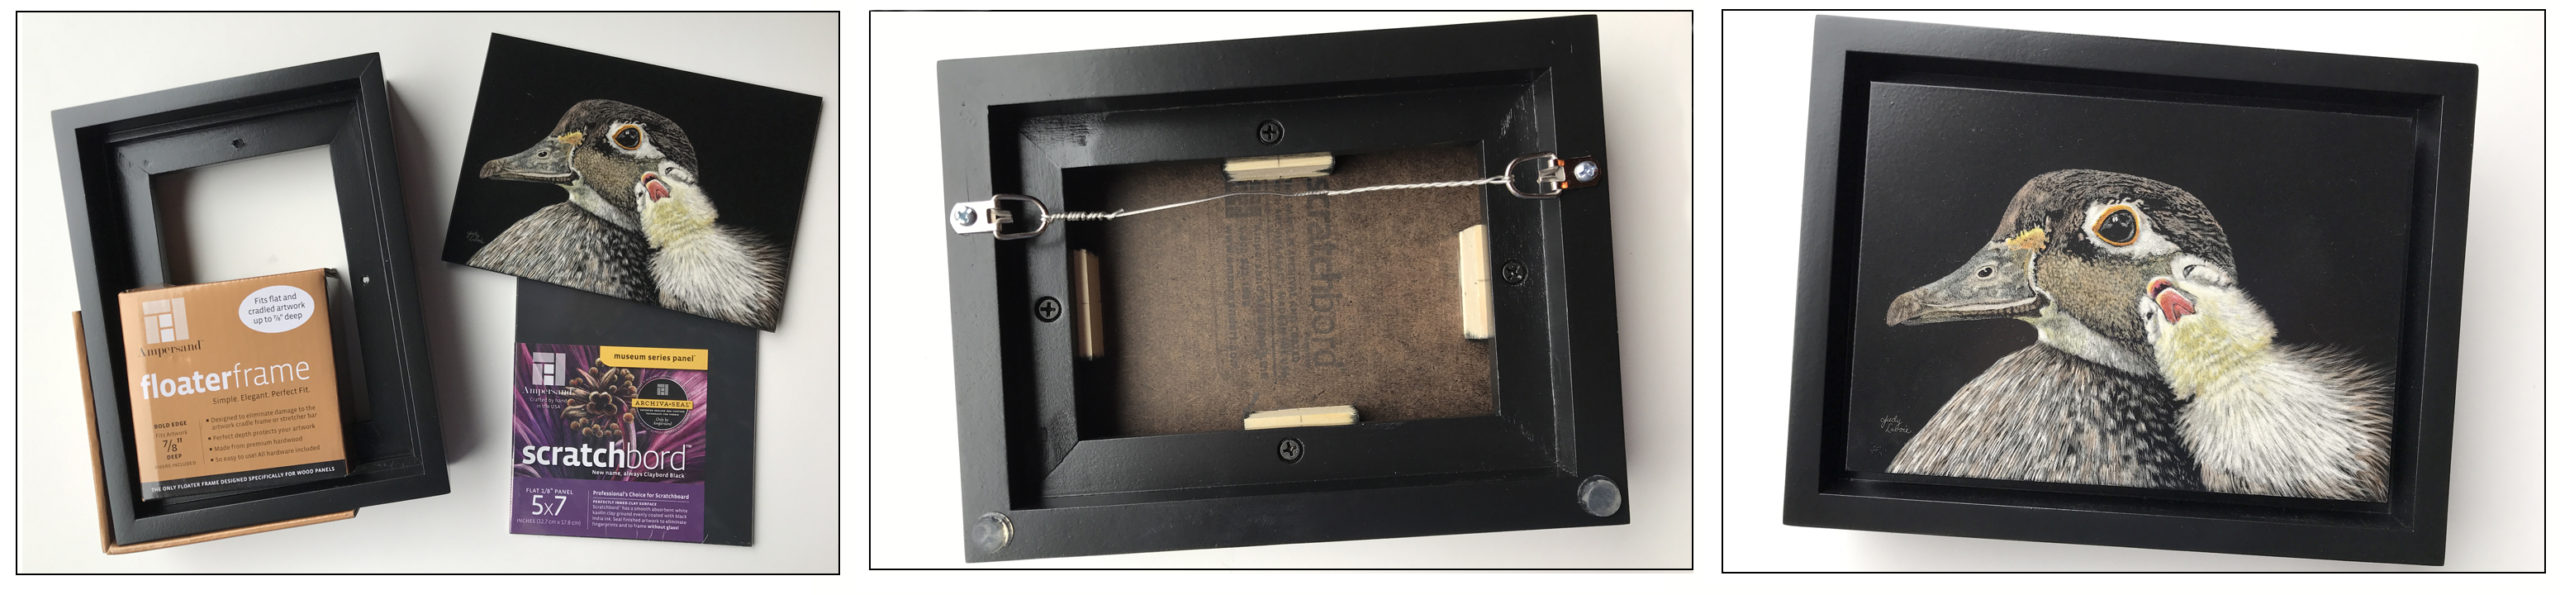
Ampersand recently added to their line of Floater Frames with sizes to fit 5" x 7" panels. When I have extended my artwork right to the edges, I like the floater frame option, since none of the frame overlaps the artwork. As the name suggests, the artwork appears to "float." There are different options within Ampersand's offerings; for this piece I chose a black finish, bold style (which shows 3/8" face around the artwork, and projects 1-7/8" from the wall), and the 7/8" depth which is designed for flat panels like the one I used. The Floater Frame kit comes with detailed instructions and all the hardware needed. The only hardware I changed was to substitute the eye hook hanging hardware with D-ring hangers, since some of the shows I enter cannot accommodate eye hooks in their hanging systems.
“This Magic Moment” is one of the greatest pop love songs of all time, and seemed like a winner as the title of my newest scratchboard.