I made a resolution to experiment with my art techniques, and here’s my first exploration. It’s a technique I learned years ago using watercolors, but I’ve applied it to acrylics (which I often use much like watercolors, but they react differently). It starts with a sheet of watercolor paper which I coat with a layer of gesso. Gesso resembles white paint but it creates a harder surface and blocks the normal absorbency of the paper so paints applied on top when the gesso is dry will sit on the surface. The concept is that after you paint on the gessoed paper and the paint dries you can remove the paint by rewetting it and blotting or wiping it off. I wasn’t sure if this would work with acrylics, because they are much more permanent when dry than watercolor pigments. I found it worked with the acrylics as well as it had with watercolor paints.

So after trying this on a swatch of paper, I decided to play and make a painting. My inspiration had come during a walk on one of the trails through our woods, on a winter day when we were in the clouds. The scene was very muted in greys and browns. I liked the way the hundreds of trees were silhoetted and fading away into the fog. I went back a few days later, when the air was more clear and took the photo shown here.
I decided to paint with a limited palette of just two colors, ultramarine blue and burnt sienna. These two colors mix to a wide array of browns and greys. A limited palette can give a painting an overall unity and calmness.

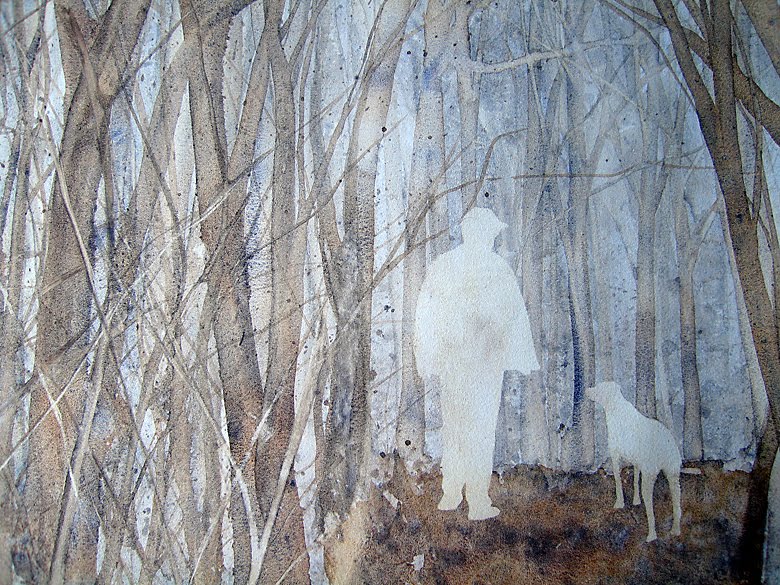 I proceeded as described above and did layer after layer of trees and branches, often “erasing out” branches and leaf areas (the beech trees hang onto lovely beige leaves until spring) and had fun. Just for interest, I decided to add figures on the trail. I drew silhouettes of Rick and Ellie Mae in the size that would look right in the painting. I traced the figures onto frosted vellum and cut them out with an x-acto knife. This became a stencil; I taped it to the dry painting, took a damp tissue, and wipe from the edges in. This removed nearly all the paint from that area, giving me a clean surface in the shape of the two bodies. The top image to the right shows the taped down stencil, the bottom shows the stencil removed and the cleaned off silhouettes. You can also see on the bottom one where I used a wet brush and painted in some branch shapes to the left of the silhouettes and wiped off the paint. Hey, that was fun!
I continued with the painting in much the same manner, creating various colors from the two paints, adding more layers of trees to create a foreground, and painting in some details on the two figures.
The photo below shows how far I’ve gone with the painting. Not what I would consider a masterpiece, but a fun exercise. It’s good to stretch my painting legs and do something different every so often!


Brent Tucker, PMP
wow .. awesome choice of art medium .. someday I'll get to meet you famous artists in person.
– Brent, Coker Creek
Cataska Creative Quilter Josie
What a great way to make fog, or anything lost in the distance, behind water. What about going from dark to light?